i3DMovieMaker
App Store
i3DMovieMaker is a 3D video/still image editing application for iPhone/iPad/Mac.(Only saving videos requires an in-app purchase, but everything else is free!)
As shown in the table below, almost all files that can be handled by the
iPhone are supported.
| 3D support in i3DMovieMaker |
| file type |
Shooting Method |
|
| L/R independent file |
Cha-cha shooting or two cameras shooting
separately on the left and right |
Select and open the two files on the left and right
to display them as a 3D image. |
| Spatial Photo |
Taken in iPhone's Spatial Photo mode
(Note) Although spatial photos on the iPhone
include depth and may be recognized as portrait photos,
This application processes them as spatial photos. |
Spatial photos are stored in a single file by combining
the angle of view of two cameras aligned horizontally
on the back of the iPhone.
If the specified file is a spatial photo, this application
automatically separates the left and right images and
displays them as a 3D image.
The short distance between the cameras makes it suitable
for capturing 3D images of nearby objects. |
| Spatial Video |
Shooting in iPhone spatial video mode |
Same as the spatial photo, it contains video taken
by the two cameras on the back.
This application automatically separates the left and right
videos and displays them as a 3D video. |
| Portrait photo |
Taken in iPhone portrait mode |
The file contains the 2D photo taken and depth information.
This application opens the 2D photo and depth map,
and when the "3D" button on the screen is pressed,
it generates and displays a left and right 3D photo |
| Cinematic video |
Shooting in iPhone cinematic mode |
The file contains the captured 2D video and depth video.
This application opens the 2D video and depth video,
and when the "3D" button on the screen is pressed,
it generates and displays a left and right 3D video. |
| Side-by-side(full-width) |
File with left and right images saved full width
Side-by-side in the application. |
Select a file with left and right images saved in full width
side-by-side by this or other apps, and select "Full SBS"
to display the left and right images. |
| Side-by-side(half-width) |
File with left and right images saved half width
Side-by-side in the application. |
Select a file with left and right images saved in half width
side-by-side by this or other apps, and select "Half SBS"
to display the left and right images. |
| Top-Bottom(full-height) |
File with left and right images saved full height
Top-bottom in the application. |
Select a file with left and right images saved in full height
Top-bottom by this or other apps, and select "Full T/B"
to display the left and right images. |
| Top-Bottom(half-height) |
File with left and right images saved half height
Top-bottom in the application. |
Select a file with left and right images saved in half height
Top-bottom by this or other apps, and select "Half T/B"
to display the left and right images. |
| 2D photo/video |
2D photo/video taken in photo/video mode
(Note) On the iPhone, it seems that even if you shoot
in photo mode, you may still get a portrait photo. |
Select 2D photo/video and choose "2D (AI conversion)"
to open 2D and depth , and press the "3D" button on
the screen to generate and display left and right 3D image.
(Compatible with iPhone 12Pro or later Pro/Pro Max models +
some other models, I believe it also works on M1 or later Macs.) |
In addition to the original in-app 3D camera functionality, I have implemented to read and write spatial video/spatial photos which was developed for Apple Vison Pro, and also implemented real-time 3D conversion using depth maps embedded in portrait photos, cinematic videos and RGB-D video/photo, In addition, for iPhone12Pro and later Pro/Pro Max models, I have added a function that uses AI to generate depth from 2D photo/videos and convert them to 3D, making it possible to display almost all images in 3D.
3D360 and VR180 videos and still images in Equirectangular format can also be displayed in planar SBS format that moves with the movement of the iPhone, so you can enjoy immersive VR images with VR glasses or VR goggles.
Control buttons at the bottom of the screen, or, Swiping right or left
on the black area of the smartphone screen other than the image display
area allows switching between images in an album.
Furthermore, the iPhone has finally become a USB-C terminal starting with
the iPhone 15, allowing output to a large screen that exceeds the maximum
size (1920x1080) that can be output from the Lightning terminal of the
iPhone 14 or earlier. So, although currently only the iPhone15 and USB-C
iPad can be used, smart glasses such as XREAL Air2/VITURE One can now be
used to view 3D images as powerful as a large screen.
This is also only available for the iPhone15/USB-C iPad, but now it is
also possible to display multi-view video on the Looking Glass using depth
maps embedded in portrait photos and cinematic videos, The same multi-view
image display on the Looking Glass can be done with 2D image + AI-generated
depth.
I have tried to incorporate all the 3D-related functions possible on the
iPhone into this application. I hope you will make use of it.
For more information on "Using RGB-D Images"
For more information on "3D360/VR180 Mode"
For more information on "Looking Glass display by iPhone"
For more information on "3D viewing with Smart Glasses"
For more information on "Reading and Writing Spatial Video/Spatial
Photographs," click here.
Click here for more information on the "Cinematic Video/Portrait Photo
3D Conversion Feature".
It can convert and display 3D video (left and right separately, half-width
SBS, full-width SBS,half-height T/B, full-height T/B, Spatial video,Cinematic
video,3D360,VR180) and 3D still images (left and right separately, SBS,
T/B,Spatial photo,Portrait photo,3D360,VR180) and 2D photo/movie (limited
to certain models) to various stereo formats (left and right separately,
half-width SBS, full-width SBS, LR/RL, various anaglyphs, VR).
You can adjust the position of the left and right images, cropping, and edit the cut of the beginning and end of the video.
You can easily edit 3D videos shot with i3DMovieCam, App built-in camera, 3D cameras, and 3D movie cameras.
In-app purchase is required to use the video saving function, but all other functions are free of charge.
(Note) About Zoom Ratio
The Zoom Ratio setting does not change the zoom ratio of each of the left and right cameras, but rather sets the zoom ratio for the left and right cameras as one dual camera. For example, in the case of a combination of a standard and a telephoto camera, where the telephoto camera is twice the standard camera If you set a zoom ratio of 1 to 2x Standard lens: set zoom ratio Telephoto lens: 2x (minimum value for telephoto camera) When set to 2x or more Both the standard and telephoto lenses will have the zoom magnification you set. This is not an app-side behavior, but an iOS-side behavior. Therefore, enter the minimum zoom ratio for the telephoto side in the zoom ratio setting. If the size of the left and right images do not match even after changing the setting values, use "Stereo Movie Maker FF" or other software for post-processing to adjust the size of the left and right images.
This application is exclusively for iPhoneXS/11/12 series and 13Pro series or later. This app uses the two side-by-side cameras on the back of these models to take 3D video/still images. As shown in the figure below, the iPhone13/14/15 cameras are positioned at an angle, so correct 3D shooting is not possible.
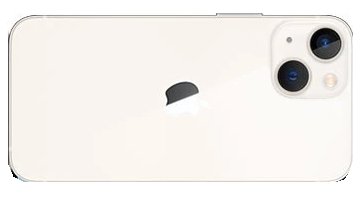
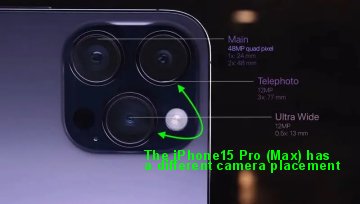
In the iPhone11Pro/12Pro/13Pro/14Pro, the main and telephoto trinocular cameras are aligned side by side.
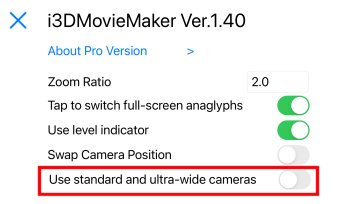
On the iPhone15Pro (Max), the camera arrangement has changed so that the
main and ultra-wide angle are now side by side (the main and ultra-wide
angle are automatically used).
Examples of editing 3D video taken with a 3D camera with i3DMovieMaker
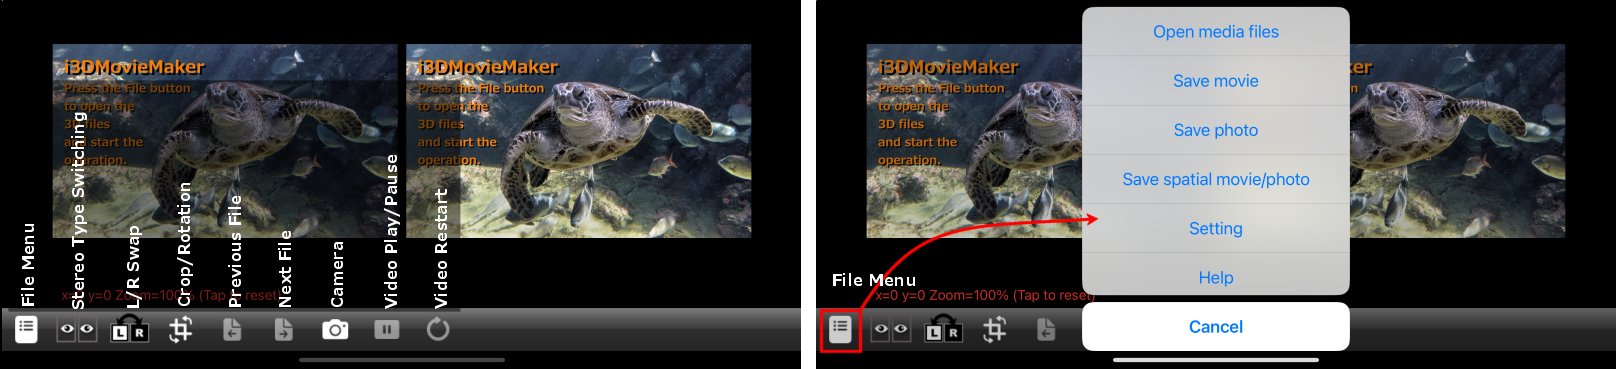 |
| File Menu button |
|
Open media files |
|
|
Open movies (left and right separately, full-width SBS, half-width SBS, Spatial Video) or still images (left and right separately, full-width SBS, Spatial Photo). Selecting Left and Right two files or selecting one SBS file. For video, select one file to check whether it is a full-width or half-width SBS or Spatial Video. If the left and right sides are opened in reverse, press theL/R button at the bottom of the screen to swap the left and right sides. |
|
Save movie |
|
|
Export the video to the Photos folder in the stereo format shown. If the video size is larger than 2160 pixels in height or width, hevc(H265) will be used. While saving the video, press any button to abort the saving (it will not be saved).
When the stereo format is [Para] or [Cross], the video is saved as two movies, left and right, but if "Save in SBS format" is turned on in the save settings, the video is saved as SBS video. The size of the saved video can also be set. (Only reduction is available. Enlargement is not possible.)
 |
|
Save photo |
|
|
Saves a still image to the photo folder in the stereo format shown. For
video, save the displayed frame image.
When the stereo format is [Para] or [Cross], the image is saved as two
files, left and right, but if "Save in SBS format" is turned
on in the save settings, the image is saved as SBS image. The size of the
saved image can also be set. (Only reduction is available. Enlargement
is not possible.) |
|
Save spatial movie/photo |
|
|
Save the displayed 3D video/photo as a spatial video/photo |
|
Setting |
|
|
Displays the application settings screen. |
|
Help |
|
|
Open this help file. |
|
Movie trimming |
|
|
You can cut off the front and back of the video and save only the necessary part as a separate video. However, the size of the video will be 1280x720 Max. |
| Crop/Rotation button |
|
|
You can crop any area of your video or still image. Set a rectangle cropping
area by touch scrolling and using the fixed aspect ratio buttons ([org],
[16:9], [4:3], [1:1]) at the bottom, then press the OK button to apply
the cropping. You can redo it as many times as you like. After cropping,
the original image size will be resized as the maximum size. |
|
|
|
Stereo Type switching Button
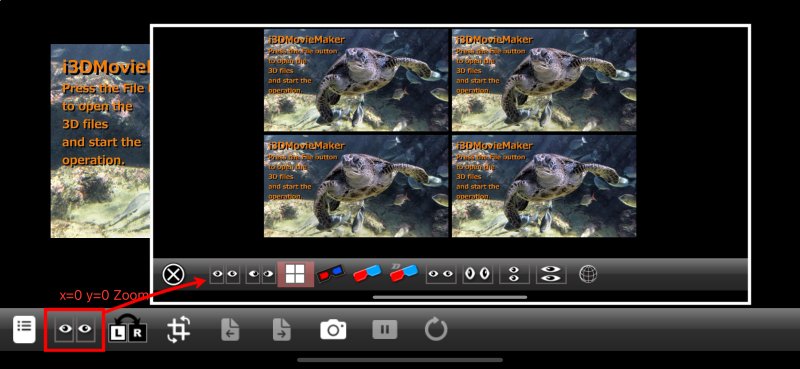
In the latest version, Top/Bottom and half-height Top/Bottom have been added. The SBS(Cross) setting has been removed. Instead, please use the "L/R" buttons as needed. |
|
|
Select your favorite stereo format from Left/Right, LR/RL, various anaglyphs,
SBS, and HSBS,T/B,H_T/B. The selected stereo format will be displayed and
saved. |
|
|
|
| L/R button |
|
|
Swap the left and right images. |
|
|
|
| VIdeo Pause/Play button |
|
|
Toggles between playing and pausing the video. The video will be played
repeatedly.
If you want to play from the beginning, select File => "Play from
Start". |
|
|
|
| Camera button |
|
|
For iPhone XS/11/12, the stereo camera will be activated. For all other
models, the single camera will be activated.
The stereo camera saves videos in separate left and right files, and still
images in SBS format. When the camera is closed, the last saved video or
still image will be displayed on the main screen.
A single camera can shoot 2D video/still images as usual. You can take
two pictures by shifting them left and right, and open them from the File
menu on the main screen to make a stereo picture. |
|
|
|
| Left and right position adjustment |
|
|
Scroll left and right with one finger on the main screen image to adjust
left and right, and scroll up and down with two fingers to adjust up and
down. If you turn on "Tap to switch full-screen anaglyph" in
the settings, tapping on the image will switch to full screen anaglyph
adjustment mode, which makes it easier to adjust. Tap on the screen again
to return to the previous screen.
In the latest version, when "Tap to switch full-screen anaglyph"
is turned on in the settings, adjustment is possible only in full screen
anaglyph adjustment mode, and left/right position adjustment is not possible
during normal display. This is in response to complaints that the left
and right positions are unintentionally changed during normal display. |
|
|
|
| full screen display |
|
|
Long tap on the displayed image to display it in full screen. Long-tap again to return to full screen. |
Examples of editing 3D video taken with a 3D camera with i3DMovieMaker
1. Panasonic DMC-3D1
Movies shot with the 3D1 will be saved in the folder \PRIVATE\AVCHD\BDMV\STREAM
in the SD card as a movie file with the extension .MTS.
Use ffmpeg.exe to convert the video to an mp4 video that can be read by iOS.
Example,
Input file name: 00001.MTS
Output file name:00001.MP4
[ffmpeg.exe -i 00001.MTS -vcodec libx264 -pix_fmt yuv420p 00001.MP4]
Transfer the converted 00001.MP4 to your iPhone/iPad and select this file
in i3DMovieCam's "Open media files" and open it with "Half
SBS".
2. Fuji FinePix REAL 3D W3
Movies taken with W3 will be saved in the same folder as photos as a movie
file with the extension .AVI.
Use ffmpeg.exe to convert the video into two mp4 videos, left and right, which can be read by iOS.
Example,
Input file name: DSCF0001.AVI
Output file name:DSCF0001_L.MP4(Left) DSCF0001_R.MP4(Right)
[ffmpeg.exe -i DSCF0001.AVI -map 0:0 -map 0:1 -vcodec libx264 -pix_fmt
yuv420p DSCF0001_L.MP4]
[ffmpeg.exe -i DSCF0001.AVI -map 0:2 -map 0:1 -vcodec libx264 -pix_fmt yuv420p DSCF0001_R.MP4]
Transfer the converted DSCF0001_L.MP4/DSCF0001_R.MP4 to your iPhone/iPad
and open these two files in i3DMovieCam's "Open media files".
batch file(conv_bat.zip)
Download this zip file and store ffmpeg.exe in the extracted folder.
mtstomp4.bat : Drop the MTS file you shot with 3D1 onto this icon, and
the converted MP4 file will be created in the same folder.
avitomp4.bat : Drop the AVI file you shot with W3 onto this icon, and you
will get two converted left and right MP4 files in the same folder.
Download ffmpeg.exe from here.
Download FFmpeg(official site)