 ...
...
 ...
...
If you press left/right buttons, SDM focus-mode will be set to manual and 'MAN' and the focused distance will be displayed on the left of the screen.
Each press of the left or right button changes the focused-distance by a varying amount related to the depth-of-field at that distance.
Alternatively, if you half-press the shutter button at the same time, focus will change by a fixed amount for each press.
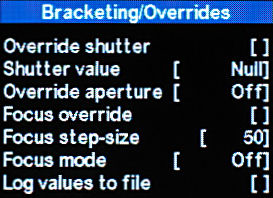
That amount is the value set in menu option Bracketing\Focus step-size.
Pressing the down button will set the hyperfocal distance and 'HYP' and the distance will be displayed on the left.
Pressing the up button will set the distance to that calculated by the rangefinder functions (see below).
Leave
The hyperfocal distance, manually-set distance or rangefinder calculated distance will be displayed.
The hyperfocal distance will change as you zoom or change aperture.
If you half-press the shutter, the camera will focus at the relevant distance.
If you have set a macro distance at the wide-angle setting but are currently zoomed, the camera will focus at the closest distance for that zoom setting.
To quickly turn focus-override on/off, enter
Rangefinder mode is accessed via the onscreen displays (OSD's).
For cameras that only permit focus-override in manual-focus mode, you must first disable Canon manual focus.
This is so that the dual-function left/right buttons may now be used to browse the OSD's in
Browse to 'Single Camera' OSD and exit
Zoom to maximum optical telephoto, point at nearest part of subject and half-press shutter until 'Near' is updated and you hear a second beep.
Now point to far part of subject and half-press shutter until 'Far' is updated.
The optimum focus distance is displayed together with required aperture to ensure everything is in focus.
The maximum shift you can use if taking left/right images with a single camera and the resulting stereo depth as a percentage of your preferred maximum is also displayed.
The aperture at telephoto may well be far smaller than the camera provides but will rapidly change as you zoom towards wide-angle.
The focus-override value will be set to the optimum focus and half-pressing the shutter button will focus at that distance.
It is not sufficiently accurate to use the above method at very close distances, instead manually enter the 'Near' and 'Far' distances in the bracketing menu, using the left/right buttons.
The increment for entering values is displayed top-left and may be changed on most cameras by using the zoom lever.
The increment may vary from '1' to '10000'.
If you display the 'Single Camera' OSD you will see those values and the parameters calculated from them.
The focus override distance in RF mode will now be set to the optimum distance for your manually-entered near/far values.
It is instructive to try this with single-camera macro shots.
It demonstrates how you cannot achieve great stereo depth.
Quite simply, the shallow distance determined by depth-of-field cannot be 'stretched' to the 'normal' stereo depth because the camera displacement required would be far too great.
The left/right views would be quite different.
You can browse to the 'Twin Cams' OSD and try a similar procedure of measuring near and far distances automatically in telephoto mode.
Again, you could enter the values manually in the bracketing menu.
Now, the bargraph shows the deviation produced by a pair of cameras with the separation that you have set in the Stereo menu.
If too great, the bargraph is red, otherwise green.
'SPORTS' Synchronised-shooting mode
In this mode you use the viewfinder to frame the action and press-and-release the switch almost twice a second.Although you cannot see both blue LED's in the waiting-state for synchronised shooting, the required delay becomes instinctive with a little practice.
From the Canon function menu, select continuous-shooting mode.
This is a fast-action mode, not a bracketing mode, so in the SDM menu 'Bracketing and Overrides' set Tv bracketing value to "Off" and bracketing-type to either "lighter","darker" or "alternating".
RICOH switch: Full-press to light the 'Ready' blue LED and then half-presses to capture the image. Full-press to end the sequence or let it time-out.
USB switch: Fully-press to light the 'Ready' blue LED and then brief release-and-press to capture each image. End sequence by allowing to time-out.
Custom timer Tv-bracketing mode (with USB switch)
This mode allows you to easily gather a number of images at different exposures, typically for high dynamic-range (HDR) applications.Focused-distance takes precedence over Tv so make sure that 'Focus step-size' is set to '0' when Tv bracketing is required.
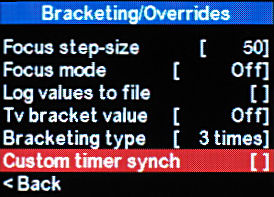
If 'Custom timer synch' mode (in the 'Bracketing/Overrides' submenu shown above), is disabled a single press-and-release is all that is required to initiate the capture-sequence.
This mode does not provide precision synchronised shooting, but for the intended subject matter this is rarely a concern.
If 'Custom timer synch' mode is enabled, you have to press-and-release for each shot but they are precision synchronised.
Be aware that foliage, vegetation, trees and the like may move in the slightest breeze and exposure-merging such images will provide unsharp results in addition to any synchronisation ghosting.
From the Canon function menu, select custom timer and set the number of exposures required.
This will normally be an odd number for symmetrical-bracketing each side of normal exposure.
On cameras that allow you to manually set the shutter-speed, you may wish to start with the shortest exposure that captures the strongest highlight without burning-out and then increase exposure each step to gradually capture the shadow details.
Or, you could do it the other way around and start with an exposure long enough to capture shadow detail and then reduce exposure each step.
Count the number of 1/3EV steps that cover the range and divide them over the number of images.
e.g. 3EV range = nine 1/3EV units so that could be nine exposures of 1/3EV or five exposures of 2/3EV.
In the 'Bracketing and Overrides' menu, set the Tv bracket value to whatever EV is required and bracketing type to 'lighter','darker' or 'alternate'.
RICOH switch: Fully press for blue LED 'Ready' light and then release to start the sequence.
USB switch: Press until blue LED lights and then release.
The camera will 'double beep' if the fastest native shutter-speed is reached (and Canon sounds enabled).
Custom timer Tv-bracketing mode (without USB switch)
For use without a switch, just press and release the shutter buttonDirectly pressing the shutter-button disables synch mode but it will be re-enabled as soon as you use a USB switch.
Custom timer focus-bracketing mode (with USB switch)
This mode allows you to easily gather a sequence of images at different focus settings even if your camera does not support a manual-focus mode.The 'image stack' is normally used to create extended depth-of-field macro images.
From the Canon function menu, select custom timer and set the number of exposures required.
In 'Bracketing and Overrides' menu, set a focus step-size greater than zero.
Make sure you are in a mode that allows focus-override (see 'Focused-distance override' above) and auto or manual focus on nearest part of the subject.
RICOH switch: Fully press for blue LED 'Ready' light and then a single half-press to start the sequence.
Alternatively, use a longer press-and-release.
USB switch: Press until blue LED lights and then release. The camera will 'double beep' if infinity focus is reached(and Canon sounds enabled) .
Custom timer focus-bracketing mode (without USB switch)
For use without a switch, just press and release the shutter button after making the above settings.Directly pressing the shutter-button disables synch mode but it will be re-enabled as soon as you use a USB switch.
The camera will 'double beep' if infinity focus is reached (and Canon sounds enabled).
Continuous-shooting Tv-bracketing mode (with USB switch)
It is also possible to acquire a series of images at different shutter-speeds (Tv) in continuous-shooting mode.Focused-distance takes precedence over Tv so make sure that 'Focus step-size' is set to '0' when Tv bracketing is desired.
In fully-automatic mode, three to 19 exposures alternate each side of the starting exposure, progressively increasing and decreasing.
From the Canon function menu, select continuous-shooting mode.
Set Tv bracketing value to whatever EV is required.
Set bracketing type to the total number of exposures required, up to a maximum of nineteen.
The maximum would give you a normal exposure, nine progressively lighter and nine progressively darker.
TvB (Tv-bracketing) should be displayed at the top of the screen.
RICOH switch: Quickly full-press for blue LED 'Ready' light and then half-press (or a longer full-press) to start.
USB switch: A long press and release starts the sequence.
The camera will 'beep' if the fastest native shutter-speed is reached (and Canon sounds enabled).
An alternative mode is when lighter/darker/alternate bracketing-type is chosen.
RICOH switch: Quickly full-press for blue LED 'Ready' light and then half-press for each exposure.
When finished, give a long (one second) full press or wait for time-out after ten seconds.
USB switch: A long press and release starts the sequence.
Continuous-shooting Tv-bracketing mode (without USB switch)
There is one difference with the above settings .. you choose bracketing type lighter, darker or alternate.(If you choose '3 times' to '19 times', alternate mode will be used).
For use without a switch, just keep the shutter button depressed.
The camera will 'beep' if the fastest native shutter-speed is reached (and Canon sounds enabled).
Continuous-shooting focus-bracketing mode (with USB switch)
It is also possible to acquire a series of images at different focus-settings in continuous-shooting mode.From the Canon function menu, select continuous-shooting mode.
Choose focus mode "Manual" and set bracketing type to the total number of exposures required, up to a maximum of nineteen.
Set a Focus step-size greater than zero.
If you want to save the focus settings and focus steps to a log file, select 'Save focus steps' in the bracketing menu.
DB (distance-bracketing) should be displayed at the top of the screen if the camera is in a suitable mode for focus-override(see 'Focused-distance override' above) .
RICOH switch: Quickly full-press and release for blue LED 'Ready' light and then half-press (or a longer full-press) to start.
Alternatively, use a longer press-and-release.
USB switch: A long press and release starts the sequence.
The camera will 'double-beep' if infinity focus is reached (and Canon sounds enabled).
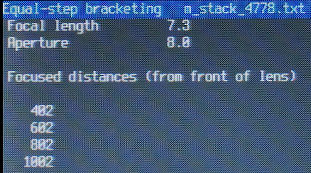
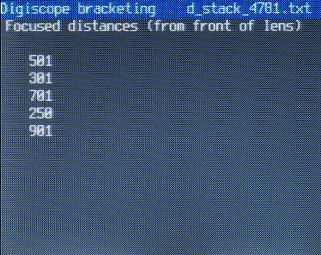
To view the log file, press the <ALT> button (anytime you are in any focus-bracketing mode)and then FuncSet to display the log files in the STACKS folder.
Manual-bracketing files are prefixed 'm_stack_' so select the required file and press FuncSet.
Exit by pressing MENU button or press FuncSet to return to the files folder.
Continuous-shooting focus-bracketing mode (without USB switch)
For use without a switch, just keep the shutter button depressed.The bracketing type can be any value.
The camera will 'beep' if infinity-focus is reached (and Canon sounds enabled).
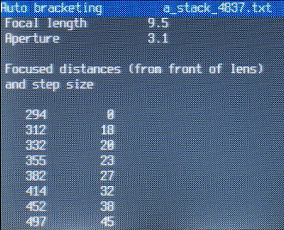
Automatic capture of images from focused distance to Infinity
Focus-bracketing using a fixed step-size is more suitable for macro imaging where the increase in depth-of-field with distance is less rapid than at further distances.For 'normal' photography, SDM provides a fully-automatic mode to capture the required number of images, taking depth-of-field at each focused position into account.
The depth-of-field of small-sensor digital cameras is so great (especially at wide-angle setting)that only a few images may be required to focus from close to infinity.
Focusing at the telephoto setting on the closest-possible subject and including 'infinity' in the background provides a more-convincing demonstration.
Assuming the camera is in a suitable mode for focus-override, choose focus mode 'Auto' and any bracketing type from '3 times' to '19 times'.
This will not be the number of images taken.
From the Canon menu choose continuous-shooting mode.
'DBA' (distance-bracketing automatic) will be displayed on the screen.
If you want to save the focus settings and focus steps to a log file, select 'Save focus steps' in the bracketing menu.
Auto or manual focus on nearest part of the subject.
RICOH switch: Quickly full-press and release for blue LED 'Ready' light and then half-press (or a longer full-press) to start.
Alternatively, use a longer press-and-release.
USB switch: A long press and release starts the sequence.
When infinity focus is reached, the camera will 'beep' and image-capture will stop.
 ...
...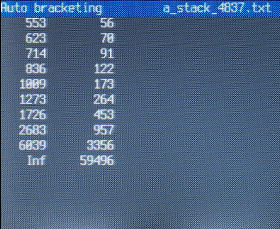
To view the log file, press the <ALT> button (anytime you are in any focus-bracketing mode) and then FuncSet to display the log files in the STACKS folder.
Auto-bracketing files are prefixed 'a_stack_' so select the required file and press FuncSet.
Exit by pressing MENU button or press FuncSet to return to files folder.
High dynamic-range subjects
Creating HDR images from your bracketed exposures can be done in a number of ways well-documented on the web.Exposure-fusion is an alternative method that does not require HDR images and tone-mapping.
A free programme to do this is 'Enfuse' which is included in the Hugin download.
Choose the option to just install Enfuse\Enblend and the droplets.
On your desktop, create a shortcut to 'enfuse_droplet.bat'.
A typical path would be "C:\Program Files\Hugin\bin\enfuse_droplet.bat"
Take the card from your camera, insert into the card-reader, multi-select all the bracketed exposures that you wish to use, drag onto the shortcut and when asked enter the number of images in each bracket sequence.
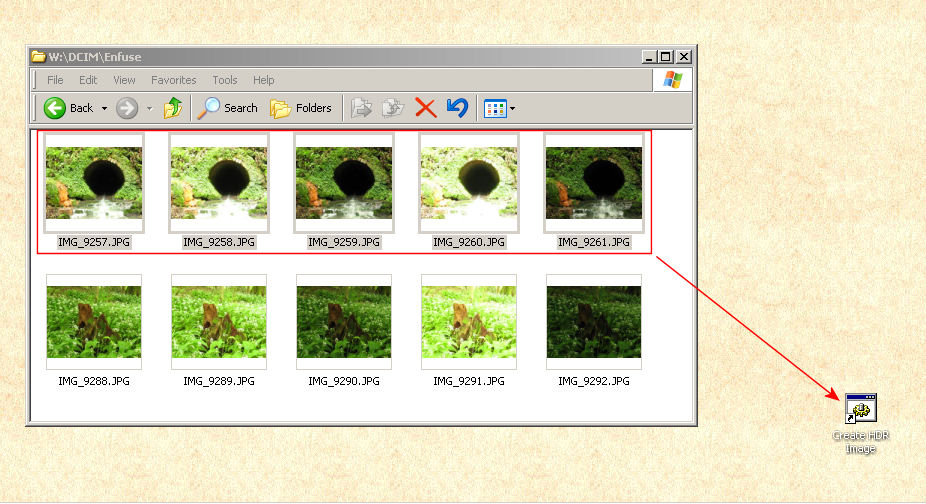
An exposure-merged image will be created for each group of bracketed-exposures on the card.
Time-lapse Imaging
Time-lapse sequences may be captured by using a timelapse script.Although it is possible to start the scripts at the same time using the USB remote, it is assumed that over time the synch will deteriorate.
It is better to use an inexpensive microcontroller (such as PICAXE) to 'press the button' of the remote switch at suitable intervals.
This will ensure good synch.
For fast capture rates (about once a second), set the camera to continuous-shooting mode and do not save RAW images.
Timer delay Imaging
A simple way of doing this is to hold-down the switch button with an elastic band or enable synch delay and set coarse delay value to less than 100.Either way, a photo will be taken after a maximum of ten seconds.
Remote Control Imaging
If using the output of a radio or infrared receiver to trigger a pair of cameras, remember that synch will be compromised if you use two receivers.It may be better to use a single receiver and a long (for hypers) length of shielded cable.
Hot Pixel Removal
See details at the bottom of this page.Video mode
At present, precision synchronisation is not supported in Video mode
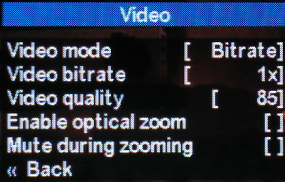
In video mode, you can choose either constant bitrate or constant quality.
When the bitrate is constant, the quality (compression) will vary with scene detail.
The camera default-setting is about 70 to 75.
With constant quality, the more detail in the scene the greater the bitrate and the larger the file.
The camera default setting is 1x.
It is recommended that high-speed memory cards (such as SanDisk Extreme III) be used.
Further details in the WIKI.
The TX1 and 'S' series cameras have a separate button for video mode but these can still be started with the remote switch.
To enter the Rec control mode, push the Movie Button for a short time (less than 0.5Sec), the blue <ALT> LED will light.
(If you push the Movie Button for more than 0.5Sec, the camera will start normal movie recording).
In the Rec control mode, when you press/release the remote switch, the camera starts recording, exits the Rec control mode and the blue <ALT> LED turns off.
To stop movie recording, re-enter the Rec control mode by briefly pressing the movie button and then press/release the remote switch.(or push the Movie button for longer than 0.5Sec.).
There is a menu option that enables optical-zooming on some cameras and while zooming the sound is automatically muted.
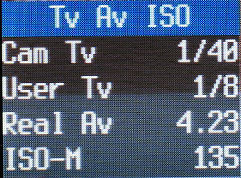
The above OSD provides useful information for video that may not normally be available.
Initially, the ISO value will be zero so change to a non-video mode and half-press the shutter to 'unfreeze' this feature.
Switch back to video mode.
At low light levels, aperture will be fully open (or ND filter will be in out position), ISO will be about 280 (grainy images) and shutter-speed 1/30 sec.
As light level increases, the ISO will fall to lowest value, typically 50.
After that, the shutter-speed increases to 1/60 sec and aperture starts to 'close'.
In very bright light the shutter speed will increase further.
This could cause jerkiness when panning as there is no 'motion blur', so you may consider fitting an external ND filter if your camera can accomodate one.
(in an extreme case of pointing camera, in movie mode, at a light-bulb, a shutter-speed of 1/1000 sec, 25 ISO and fully-closed aperture was indicated).
As reports of the movie synchronisation 'precision' with various cameras varies, an alternative is to try a script such as the following :-
@title Movie test
beep
wait_for_switch_press
press "video"
sleep 500
release "video"
rem may need this next line
sleep_for_seconds 1
wait_for_switch_press
press "video"
sleep 500
release "video"
beep
end