Digiscoping
SDM has features that aid the capture of images taken with a camera connected to a telescope (digiscoping).
After power-up, your camera can be completely set-up and waiting for you to press the remote switch.
Although normally used in continuous-shooting mode, digiscoping mode is also useful for single-camera non-stereo photography in single-shot mode.
That is because the screen does not shut-down after three minutes and the photo is taken immediately on switch-press and not on switch-release that we use for synchronised stereo photography.
In single-shot 'Digiscoping' mode the legend 'DIG' will be displayed on the screen.
A bracketing series of exposures are taken around a reference point that is automatically returned to after each sequence.
The focus-step values and details of your digiscoping setup can be saved to a file.
The file is available for display immediately after shooting the sequence.
Before enabling digiscoping, make sure that the current shutdown time for the screen is at least one minute, preferably three.
You should first enter information about your digiscope setup in Advanced Menu\Digiscoping.
 ...
... ...
... ...
...
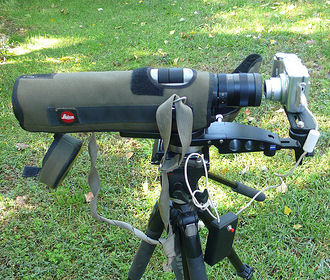
Thanks to Gabriel Garcia Sevilla for testing (see above images) SDM digiscoping with his A570 and A590 cameras mounted on a Leica Apo Televid 62.
The eyepiece used is a 16-48x zoom and the camera is mounted using a Zeiss Quick Adapter.
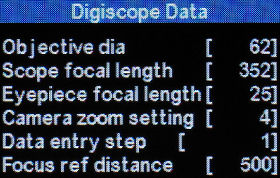
- Objective diameter
Value in mm.
Determines exit-pupil diameter (among other things)
- Scope focal length
Value in mm.
Determines telescope magnification.
- Eyepiece focal-length.
Determines telescope magnification and exit pupil diameter.
This is an integer value so for eyepieces that have a magnification value
focal length = 250/magnification.
e.g. a 10x eyepiece is 25mm focal-length.
- Camera zoom setting
This is the step number of the zoom setting that you use for digiscoping.
Widest angle is step 0, next is step 1, etc.
- Data entry step may be set to 1,10,100 or 1000 to aid entry of Focus ref distance.
- Focus ref distance
This is the distance at which the camera will focus and where the virtual image produced by the telescope is located.
The camera will automatically return to this position after the capture-sequence is completed.
Focus steps will have a 'gentler' effect if this distance is not too great, 500mm is suggested as a starting point.
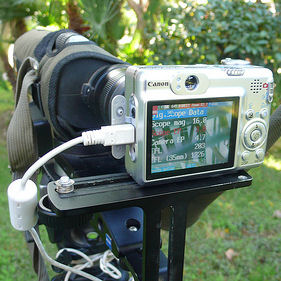
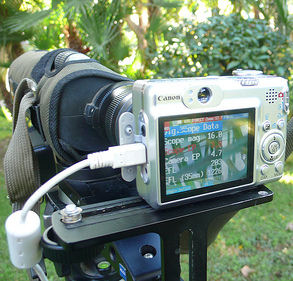
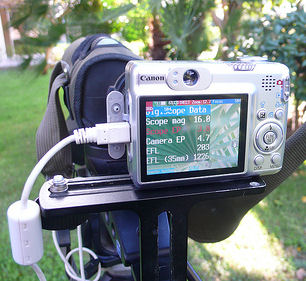
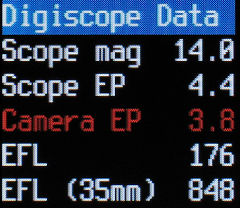
Once you have entered the above you may view the derived information displayed on the large-character on-screen display (OSD).
Enter <ALT> mode and use left/right buttons to browse to the digiscope OSD.
If no OSD's are displayed, press FuncSet to display them.
If you still do not see anything you are displaying one of the many 'convenience' blank displays so just press left/right to browse.
You can show or hide the digiscope OSD at any time (except when any focus-bracketing mode is enabled) by pressing FuncSet in <ALT> mode.
If any bracketing mode is enabled, pressing FuncSet will display the folder containing the focus-stack files.
- Scope mag
Telescope magnification = objective f.l./eyepiece f.l.
- Scope EP
Diameter of the scope exit-pupil in mm.
Text red if this is limiting aperture (smaller than camera entrance-pupil).
- Camera EP
Camera entrance-pupil diameter in mm.
Text red if this is limiting aperture (smaller than scope exit-pupil).
- EFL
The real focal-length of the camera/scope combination.
- EFL (35mm)
The 35mm-equivalent focal-length of the camera/scope combination.
This is based on ratio of 35mm film diagonal and digital camera image-sensor diagonal.
(35mm film is 3:2 aspect-ratio, cameras supported by SDM are 4:3 aspect-ratio).
A simple way of readying the camera for digiscoping is to run a suitable script on start-up.
The script can set continuous-shooting and manual-focus modes, zoom to the required focal-length and focus at the reference position.
If the script is named 'Startup.bas' (and you enable Autostart in the scripting menu), on completion your usual default script will be resident.
A few example scripts are provided with the download in the DIGI_SCRIPT folder.
Here is a script for the A620 that presses the FuncSet button, moves down the icons on the left to shooting mode and selects continuous-shooting,presses the down-button to set manual-focus mode and then zooms and focuses.
It waits for you to press the USB switch, takes five bracketed images and then waits for you to press the switch again.
@title Startup
rem autostart script for digiscoping with A620
rem sets continuous-shooting mode, digiscoping focus-mode and manual-focus mode
rem when prompted, press your USB switch. Press shutter button to finish.
sleep_for_seconds 5
click "set"
sleep_for 300
click "down"
sleep_for 300
click "down"
sleep_for 300
click "right"
rem press Set on continuous-shooting icon
click "set"
sleep_for 1500
rem set manual focus mode
click "down"
sleep_for 300
click "down"
sleep_for 600
rem set focus mode to digiscope
digiscope_bracketing
number_of_images_to_capture_is 5
rem focus and zoom
click "shoot_half"
" Digiscope bracketing"
:loop
" Press switch"
wait_for_switch_press
"#"
start_continuous_sequence
wait_until_done
end_continuous_sequence
goto "loop"
end
To manually enable digiscoping, set continuous-shooting and manual-focus modes and in Bracketing/Overrides set focus-type to 'digiscope'.
If everything is set correctly, 'DBD' (distance-bracketing digiscope) and 'CONT' (continuous-shooting mode) will be displayed.
Half-pressing the shutter will then zoom to your required setting and focus at the reference distance.
Automatic focus-bracketing
If both the telescope and camera are focused to infinity, then it is not possible to focus-bracket as the camera cannot focus beyond infinity.
Instead, for close and mid-range subjects we allow the primary image to be focused nearer to the eyepiece than for infinity focus.
This produces a virtual image that the camera can focus on as long as it is located approximately 250mm to infinity from the camera lens.
In practice, SDM limits the nearest reference-focus point to 450mm.
A suitable value for general use is 500mm.
This is the procedure :-
- From the Canon menu select continuous-shooting mode.
- If the aperture has changed, half-press the shutter button so that the updated value is available to SDM.
If you do not do that, the log file may have an incorrect value for camera entrance pupil and aperture.
- Ensure the camera is in a mode that supports focus-override.
On some cameras that means selecting manual-focus macro mode.
- In 'Brackt/Override' menu, ensure 'Tv bracket value' is 'off'.
'Bracketing type' can be set to anything from 3 times to 19 times.
This determines the number of bracketed images taken
Enter a value for the focus-step size and in the same menu choose 'Digiscop[e] for focus mode .
- Exit <ALT> mode.

You should see 'DBD' (distance-bracketing digiscope) displayed at the top of the screen with 'CONT' (continuous-shooting) underneath.
The camera will automatically focus at the chosen reference position.
Attach camera to telescope and focus the telescope as accurately as possible on the subject.
This is obviously easier to see in magnified view mode.
- With both a Ricoh switch and ordinary USB switch the capture-sequence will start as soon as you press the switch, not on its release.
This is indicated by 'FAST' at the top of the screen replacing 'DIRECT' mode.
After the sequence is completed the focus will return to the reference position.
- If you have chosen the option to save the focus-stack and digiscope values to a text file, you may view them immediately by pressing the FuncSet button.
 ..
.. ..
..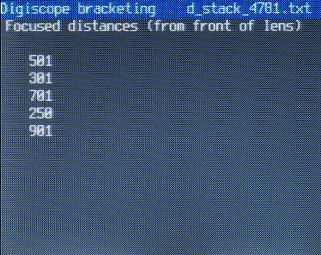
All focus-bracketing files are saved in the A/CHDK/STACKS folder and digiscope stacks are prefixed 'd_'.
Select the appropriate file, press FuncSet to display it and the up/down buttons to move between pages.
Press FuncSet to return to 'Select text file' or press MENU to exit.