Image/Movie uploading to the PC
Images may be conveniently uploaded to the PC by using Patrick Mortara's 'WIA-Loader'.
You can use the USB cable or a flash-card reader.
The USB option is useful if you do not wish to disturb your rig in order to gain access to the memory cards.
Special support has been added for SDM to allow the uploading, thumbnail display and renaming of images (including raw) and movies.
This feature is in early development, please report problems to Patrick via his website.
After importing, you can automatically run SPM (for JPG viewing), PICASA (for RAW or DNG viewing) or DNG4PS-2 for converting the RAW to Adobe digital negative (DNG) format.
Optionally, the corresponding files on the camera may be deleted.
You should take a few photos (JPG and RAW) using SDM 1.74 or later before trying the following procedure.
Any existing RAW files or JPG images not native to the camera should be removed from the card.
First, download and install google picasa 3 (beta).
download and install DNG4PS-2.
Download and install 'WIA-Loader' 1.5.1.0 (or the beta version) or later from http://www.mortara.org/comp/wialoader.php
Note that it requires the Net framework 2.0 or later to be installed, a link to the 3.5 version is on the website.
Choose the option to launch WIA-Loader after completion of loading.
There can be a lot of data on the memory card (especially movies and RAW images)so it is recommended you use a USB 2.0 port on the computer to get adequate transfer speed.
Alternatively, use a flash-card reader.
For uploading via USB, turn-on your camera, in Scripting menu uncheck 'Disable USB Download' and switch to playback mode.
If you are using a dual-partition card, use SDM menu option Debug\Swap partitions before proceeding.
Remember to swap again (using the SDM installer) to restore camera to normal SDM booting.
Alternatively, just unlock your card and startup in playback mode.
Plug the USB cable into the computer USB 2.0 port.
The camera should be recognised and its name and a loading-preview message displayed at bottom left of screen and when loading is complete the left pane will display a preview of the JPG, CRW, and AVI files.
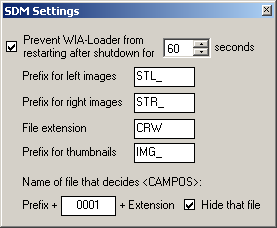
The SDM raw files will be prefixed 'STL_' or 'STR_' and the Canon JPEG files prefixed 'IMG_'.
If using a card reading, insert the card and close the window that starts-up.
Start WIA-Loader and using Source menu select the card-reader.
First, we need to create an import profile that describes the sequence of operations that we wish to execute.
Click 'File\Options' and then 'Import profiles'.
Click the left-most icon  to create a new import profile.
Two default steps will be created .. Transfer and SaveAs.
Enter the name of your profile in the 'Profile' box ('SDM_RAW' has been used here).
We will be having two SaveAs steps, one for JPG and another for SDM raw so highlight 'SaveAs' and from the 'New step' drop-down menu choose 'SaveAs' and click the '+' sign to add the step to the list.
Click the down arrow to move SaveAs[2] after SaveAs.
We will now define the parameters for each step so first highlight 'Transfer'.
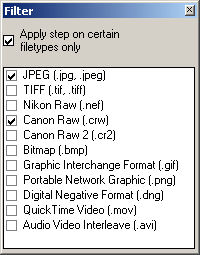
Click on the file-type icon  (to the right of the up/down arrows), check 'Apply step on certain filetypes only' and select JPG and 'Canon Raw (.crw)' files.
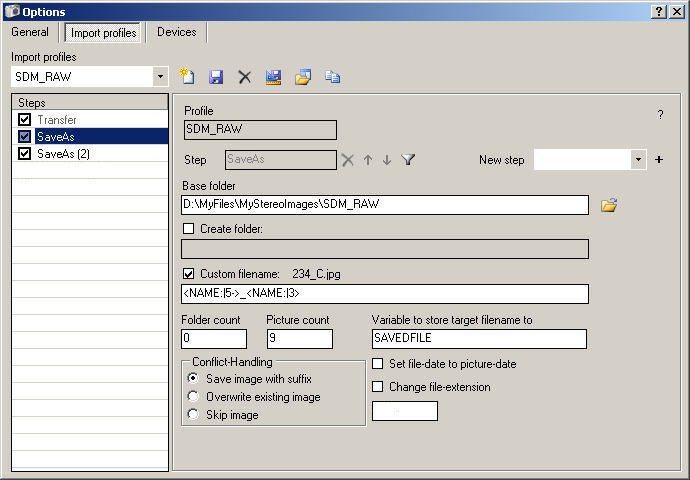
Close that window and highlight step 'SaveAs'.
Click the filetype icon , check 'Apply step on certain filetypes only' and select Canon Raw(crw) only.
Choose a 'Base folder' for your saved RAW images by entering the path-name or browsing by clicking the folder icon.
In this example, we have chosen 'D:\MyFiles\MyStereoImages\SDM_RAW'.
We will rename the files so tick the 'Custom filename' box and enter the following :-
<NAME:|5->_<NAME:|3>
This filter constructs a new name from the fifth character to the end (1234), an underline character (_) and the third character of the name (L).
A file STL_1234.crw will be renamed 1234_L.crw.
Optionally, check 'Change file-extension' and enter new value.
PICASA will open, preview or upload to Picasa Web Albums, SDM raw files with the CRW extension only
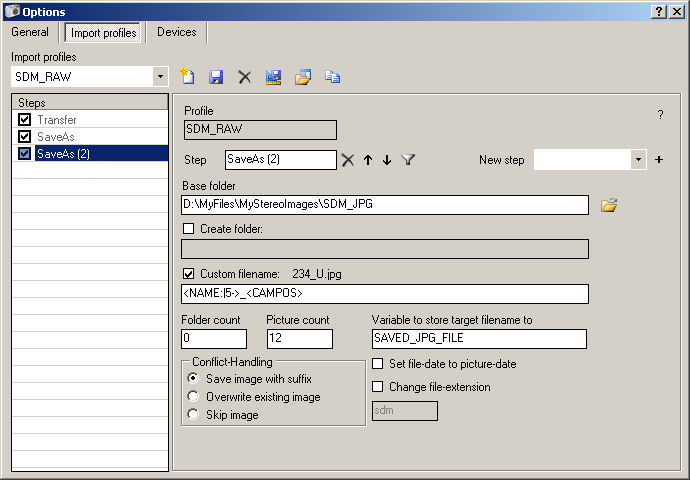
Highlight step 'SaveAs[2], click the filetype icon , check 'Apply step on certain filetypes only' and select JPG only.
Again, choose a folder to save the jpg files ('D:\MyFiles\MyStereoImages\SDM_JPG' is used here).
Tick the 'Custom filename' box and enter the following :-
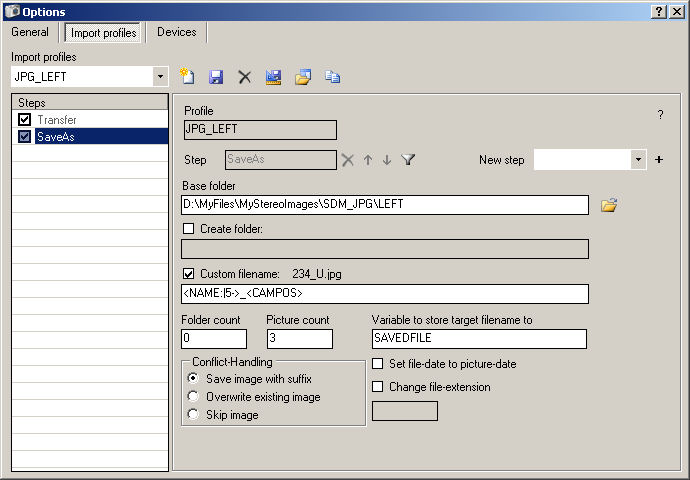
<NAME:|5->_<CAMPOS>
(<CAMPOS> is a variable that stores the camera left/right position).
IMG_1234.jpg will be renamed '1234_L.jpg' or '1234_R.jpg'.
In this example, enter SAVED_JPG_FILE in the 'Variable to store target filename to' as this information will be used later.
You can choose your own name for that variable but make sure that there is no 'white-space' at the beginning or end of the name.
Click the floppy disk icon to save this profile
If you get an error message, click again.
At top left of the screen there is an 'Use import setting' drop-down menu that is currently blank.
Choose your just-saved profile and it will be immediately applied to the previewed images.
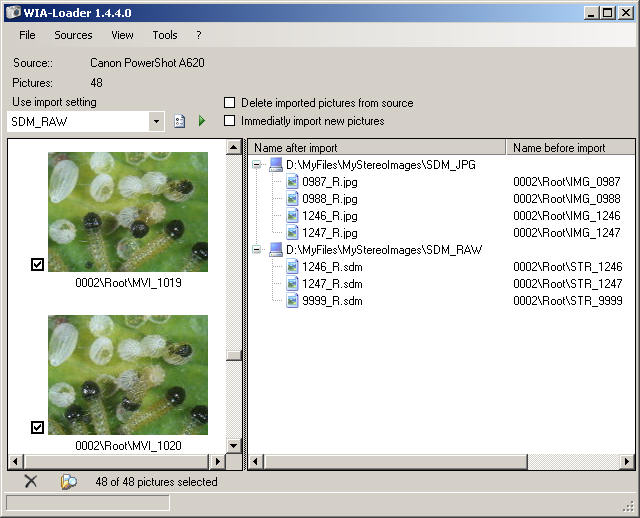
The right pane will show which images are to be saved and to which folder and their names before and after import.
If target folders or new filenames are incorrect, click the Edit Profile icon  and make your changes.
Remember to save your changes.

Clicking the above icons allow you to create a new profile, save a profile, delete a profile, export a profile, import a profile and copy a profile.
In the Export Profiles menu you may click the icon to save all your settings (as an XML file) that WIA-Loader can load when you click the Import Profiles icon.
You can have a collection of profiles that treats the files in many different ways.
When you are satisfied that your settings are correct and have been used, click the Import icon  to execute all the steps that you have defined.
On completion, the file-names in the right pane will be coloured green
Check that the saved files are in the target directories.
If all is well, you may check 'Delete imported pictures from source' to remove the source images from the camera.
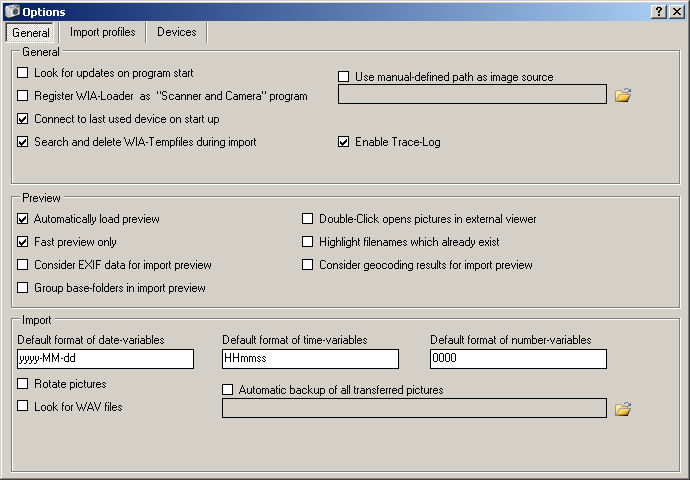
Finally, in 'Options\General', check 'Register WIA-Loader as "Scanner and Camera" program' and 'Connect to last used device on start up' and exit the programme.
You will normally want to delete the temp files on import, especially when uploading many movie files or lots of RAW images.
Trace-Log should only be enabled when you require to provide information for fault finding.
With WIA-Loader 1.5.1.0 and later, the settings used by SDM may be user configured :-
Auto-run WIA-Loader on camera connection
Remove the USB plug from the camera and re-insert it.
If any programme window pops-up, close it.
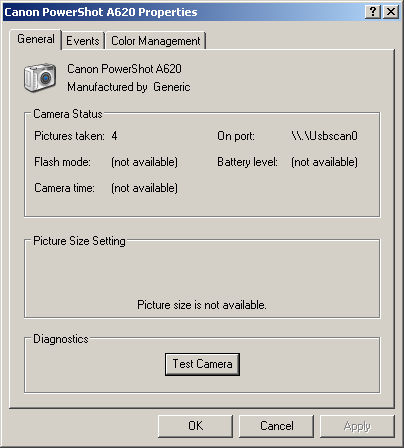
In 'My Computer' right-click the icon for your camera and select 'Properties'.
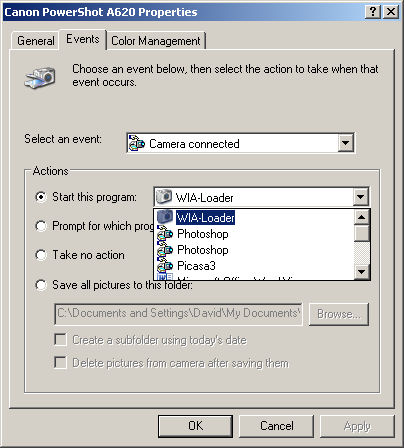
In 'Events' select 'Camera connected' event and in 'Actions' choose 'Start this program'.
From the drop-down menu select 'WIA-Loader'.
Next time you connect to your camera, WIA-Loader will start-up.
Running an external RAW and JPG Image-Viewer Programme
After the images have been saved, it may be useful to start an external programme.
First, let us view the JPG images as a slideshow using PICASA 3.
In WIA-Loader, click the Edit Profile icon and highlightSaveAs[2] step.
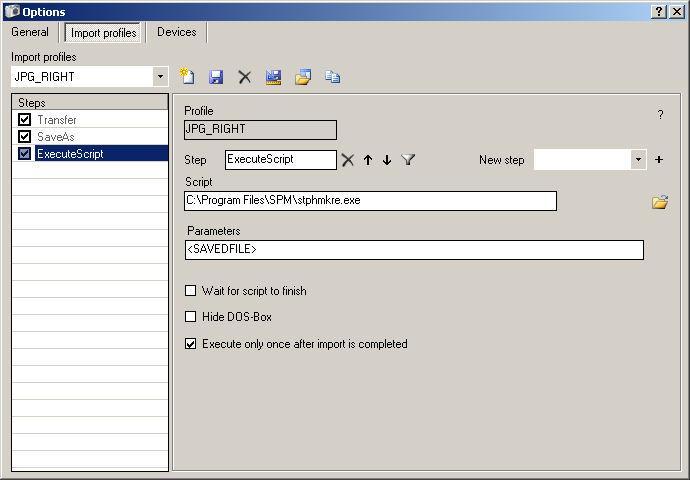
From 'New step' drop-down menu, select 'ExecuteScript' and click '+' to add the step.
Use arrows to move that step to after SaveAs[2].
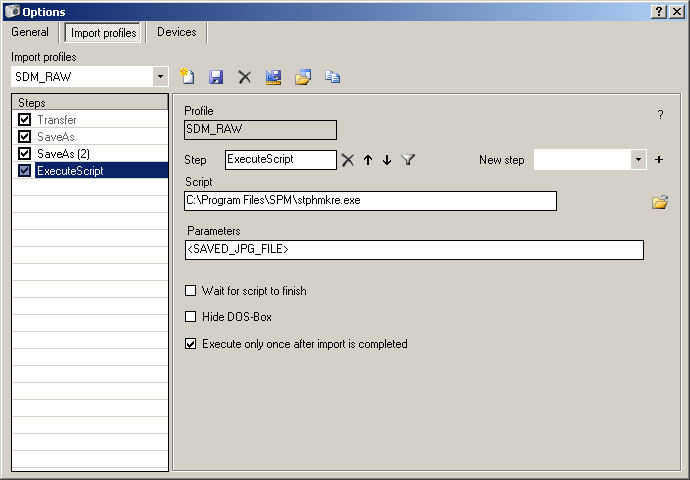
The script will simply be the full-path to the PICASA viewer file (the above screenshot shows path to SPM instead) and Parameters will be the name of any JPG image that is saved by the current profile.
In Windows Explorer, navigate to the location of the PICASA file 'PicasaPhotoViewer.exe'.
It will typically be located at "C:\Program Files\Google\Picasa3\".
Right-click on the programme icon and 'Create shortcut'.
Right-click on the shortcut, select Properties, right-click on highlighted Target and copy.
This is simply a convenient way of ensuring the full pathname is correctly specified.
In WIA-Loader,select 'Script', right-click and paste and remove inverted commas at beginning and end.
In our SaveAs[2] step we defined parameter SAVED_JPG_FILE to store the full pathname to an image, so we simply use that variable (with angle-brackets) as the script parameter.
It is the path to the image that will be displayed when PICASA starts-up.
Check 'Execute only once after import completed' and save your settings.
At present, you should exit and restart WIA-Loader and then select your profile and click the 'Start Import' icon .
After loading is complete PICASA should start and display one of your images.
Click the PICASA Play button to automatically display the rest of the images in the folder.
If PICASA did not start and you get error message "The location does not contain a valid image file", check that in SaveAs step that SAVED_JPG_FILE is not entered as <SAVED_JPG_FILE> and in step ExecuteScript it is entered as <SAVED_JPG_FILE>.
Converting the RAW files to Adobe digital negative (DNG) format
Let us now change the script to automatically launch a programme to convert the RAW files to Adobe digital negative (DNG).
Using Windows Explorer browse to the location of DNG4PS-2 folder, create a shortcut to DNG4PS-2.exe and as described above copy and paste the pathname to the script.
No script parameters are required.
Save your settings and click the 'Start Import' icon .
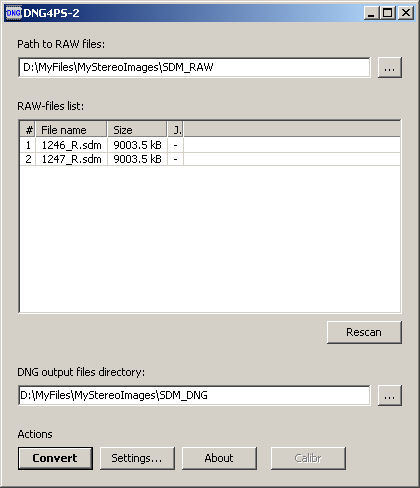
On completion of image saving, DNG4PS-2 will startup and may give an error message saying that it cannot find the image folder.
If so, click the icon to the right of 'Path to RAW files'and browse to the image folder.
This example above uses path 'D:\MyFiles\MyStereoImages\SDM_RAW' as described in the SaveAs step.
The RAW files will be displayed in RAW-files list.
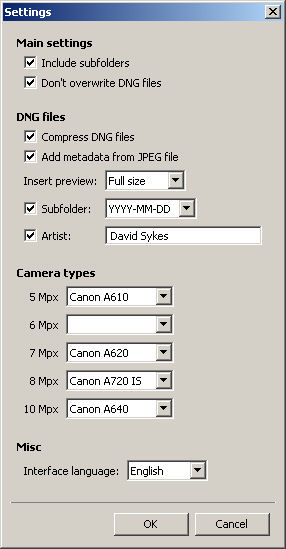
The first time you use DNG4PS-2, you should click 'Settings' to set your camera type and then browse to the desired output files directory for the DNG images.
This example above uses path 'D:\MyFiles\MyStereoImages\SDM_DNG'
It may require a number of sessions before DNG4PS-2 remembers the folder settings.
Click 'Convert' and when the Conversion log indicates 'FINISHED' you may exit.
The DNG images may be viewed as a slideshow by right-clicking and opening with PICASA or you can associate PICASA with the DNG extension.
Uploading images from two cameras and auto-running StereoPhoto Maker
This is work in-progress but worth trying for the potential time-saving
You can connect a single USB cable to one camera at a time or have multiple cameras connected to a USB hub as long as you switch them on/off one a time.
In this example, we save JPG images to separate left and right folders and then launch StereoPhoto Maker to view or auto-correct them.
Create a new empty profile for the left camera and after naming it (JPG_LEFT, for example) immediately save.
For the Transfer step, select filetypes JPG and Canon RAW (crw) even if you have not taken any raw images.
For the SaveAs step, enter the path to an existing Left folder.
Save the profile and then create a similar one (JPG and RAW) for the right camera that includes path to an existing right folder.
After SaveAs, add a Scripting step to autostart SPM with the last-saved JPG image.
Save the profile.
Select profile 'JPG_LEFT', and plug USB into powered-up left camera in playback mode.
Click 'Start Import' icon to transfer the files.
On completion, remove USB plug from camera and select profile 'JPG_RIGHT'.
Insert plug into powered-up right camera in playback mode.
This will probably give you an error message but, for now, just click 'Do not send'.
Click 'Start Import' icon to transfer the files.
On completion, SPM should start-up and display a 'scrambled' image.
That is because SPM's 'Launch' settings (in Preferences) cannot currently handle separate left/right images.
From the SPM File menu, select the first image in the left and right folder.
They will be displayed in your chosen viewing format and pressing the space-bar or clicking on the screen left/right edges advances to the next image.
After reviewing your image-pairs, you will probably use SPM Multiconversion to auto-correct them.