Simply enclose the text between quotation marks.
If preceeded by a space, the background will be blue.
If preceeded by a '#' symbol, the background will be green.
If preceded by an exclamation (!) mark, the background will be red.
The colour-formatting symbols are not displayed.
Example 1:
" This is text"
"# Press shutter"
"! to exit"
while 1
do
wend
af_led_off/af_led_on
The autofocus LED is bright and visible from some distance.This makes it useful for kite aerial photography (KAP) scripts to indicate completion of operations.
aperture
A user-friendly way of entering override aperture-values on cameras that have a physical aperture:-aperture 3.5
@title Aperture
@param a numerator
@default a 2
@param b denominator
@default b 8
aperture a . b
shoot
end
auto_focus_all
Use before the 'time_lapse' command to force autofocusing on every shot.Not to be used if camera set to manual focusing.
auto_focus_first
Use before the 'time_lapse' command to autofocus the first shot.When 'time_lapse' command is executed, autofocus lock (AFL) is applied and 'AFL' displayed at top left of screen.
Not to be used if camera set to manual focusing.
blink_af_led_for
This blinks the autofocus LED for the set time.e.g blink_af_led_for 5 blinks autofocus LED for five seconds.
auto_focus_bracketing
Used in continuous-shooting mode to capture images from focused distance to infinity.The camera must be in a mode that allows focus-override and in continuous-shooting mode.
(if using custom timer mode, the sequence will end after the set number of exposures.
Focus may or may not reach infinity).
For the example below, set camera to continuous shooting.
At the wide-angle setting, infinity will be reached in only two or three steps from 1000mm.
The example zooms the lens to get more steps (on non 'S' series cameras).
The focused distance is displayed at the top of the screen for each step.
'DBA' is displayed to indicate 'distance-bracketing automatic' and 'CONT' for continuous-shooting mode.
Press your USB switch to start, the camera will beep when infinity-focus is reached.
Example 2:
set_zoom_to_step 7
set_focus_to 1000
auto_focus_bracketing
" Autofocus bracketing"
" Press switch"
wait_for_switch_press
start_continuous_sequence
wait_until_done
end_continuous_sequence
beep
Makes a brief 'beep' sound.Example 3:
sleep_for 1000
beep
sleep_for 1000
beep
end
blue_led_off/blue_led_on
Turn the blue LED on/off.Example 4:
sleep_for 1000
beep
blue_led_on
sleep_for 2000
beep
blue_led_off
end
bracketing_done
Returns '1' when all bracketing shots have been taken.The following is equivalent to 'wait_until_done' command :
set_focus_to 500
do
until is_key "remote"
shoot
do
until bracketing_done = 1
break_usb_connection
Disables USB upload and returns to record mode.This will only work with programmes on the PC that have already exited in a controlled manner.
Example:
make_usb_connection
sleep_for_seconds 35
break_usb_connection
change_ev_by
Changes current shutter-speed (exposure value) by the required number of 1/3 EV steps.Negative numbers increase exposure.
data_received
When using the 'send_data' command to send three bytes of data to an external device (such as a Picaxe microcontroller), a returned value of '1' indicates that the data was received without error and the device replied within 100 msec.e.g data_received a ('a' = 1 if data received).
digiscope_bracketing
Used to capture a number of images focused each side of the scope virtual image.The camera must be in a mode that allows focus-override and continuous or custom-timer shooting.
For the example below, set camera to continuous shooting.
(To see the effect of focus-change with this example you really need a digiscope setup)
Focus value is displayed at the top of the screen and on completion the camera refocuses at the starting distance (reference focus).
The Canon firmware may not focus at a precise numerical distance, just as close as it can get.
Example 5:
set_zoom_to_step 3
set_focus_to 600
digiscope_bracketing
number_of_images_to_capture_is 5
" Digiscope bracketing"
" Press switch"
wait_for_switch_press
start_continuous_sequence
wait_until_done
end_continuous_sequence
enable_usb_download/disable_usb_download
When USB download is disabled, the camera will not try to connect to the PC when a voltage is present on the USB connector V+ pin.This is the usual mode when using a remote switch.
By enabling USB download and switching to Playback mode, a selected programme on the PC will startup when the USB connector plugged-in.
each_photo_alternating/each_photo_darker/each_photo_lighter
Used before starting a Tv (shutter-speed) bracketing sequence with custom-timer shooting mode.(continuous-shooting mode bracketing is alternating only).
For the example below, set number of exposures in custom-timer 'Shots' and delay to zero.
Example 6:
hdr_bracket_1/3_ev_steps 2
each_photo_lighter
" Press switch"
wait_for_switch_press
" Each image lighter"
start_custom_timer_sequence
wait_until_done
end_time
This is a synonym for 'finish_time' and is used in conjunction with 'sleep_until' or 'start_time'.'end_time/finish_time' MUST come before 'sleep_until/start_time' in your script.
It indicates the time in hours and minutes that an operation should end.
At present, only 'time_lapse' command supports this feature.
The following script will blank the display until start time (default is 12:30) .
It will then take a photo every minute until end time.
End time is four minutes after start time
. The time-lapse setting for this feature must be 'endless'.
@title Real time
@param a hours
@default a 12
@param b minutes
@default b 30
" Going to sleep"
sleep_for_seconds 3
rem finish after four minutes
finish_time a, b + 4
start_time a, b
rem ten second delay then photo every one minute
time_lapse 0, 10 ,1 , 0, 3, 1, 0, 3, 3, 0, 2, 3, 0, 50, 500, 0, 0, 0, 0, 0
end
equal_step_focus_bracketing
Used to capture a number of images using a fixed focus-step from a start focus.The camera must be in a mode that allows focus-override and continuous or custom-timer shooting.
Useful for extreme close-ups where depth-of-field increasing very slowly with focus distance.
For the example below, set camera to continuous shooting.
Example 7:
set_focus_to 500
equal_step_focus_bracketing
number_of_images_to_capture_is 3
" Equal-step bracketing"
" Press switch"
wait_for_switch_press
start_continuous_sequence
wait_until_done
end_continuous_sequence
finish_time
Synonym for 'end_time', you can use either.get_focused_distance
This is a synonym for 'get_focus', you can use either.get_focus_ref
Returns the focus position (on the virtual image) used by digiscoping function.get_fov
Returns the horizontal field-of-view (in degrees) in the supplied parameter.get_script_speed
Returns the current speed (1 to 5) of the script.See the 'set_script_speed' statement below.
get_shooting_mode
Synonym for CHDK 'get_shooting'.get_sync
Returns synch status and delay values. See 'set_synch' below.hdr_bracket_1/3_ev_steps
Used in Tv bracketing to specify the exposure-step in units of 1/3EV.3 EV is equivalent to one stop.
hdr_focus_stack
Captures multiple stacks of images from current focus to infinity.Each stack forms part of an exposure-bracketed series.
The first parameter is the number of stacks, the second is the exposure-change (in 1/3 EV units)between stacks.
is_this_right_camera
is_this_right_camera aReturns '1' in 'a' if true.
lcd_on_off
Toggles on/off state of the LCD by 'pressing' the DISPLAY button.Not supported by all cameras.
(also see 'turn_backlight_off/turn_backlight_on' below)
Example 8:
" Press switch"
" LCD will blank"
" for 5 seconds."
wait_for_switch_press
lcd_on_off
sleep_for 5000
lcd_on_off
end
line_1,line_2,line_3
Print script output directly onto one of the script-console lines without scrolling.See the readYUV script example below.
lock_autofocus/unlock_autofocus
After half-pressing shutter and giving camera sufficient time to focus, the auto-focus may be locked.'AFL' will be displayed on the screen.
You may unlock autofocus using the script command or half-press shutter button and press right button until 'AFL'not displayed.
Example 9:
sleep_for 1000
press "shoot_half"
sleep_for 1000
lock_autofocus
"! locked"
"! 'AFL' top left"
load_edge_overlay
Loads the edge-overlay stored on the memory card.make_usb_connection
Switches to playback mode and enables USB upload.The following example connects to a remote-capture programme such as PSRemote and capture five images at ten seconds interval :-
make_usb_connection
time_lapse 0,15,0,10,5,0,0,3,3,0,2,3,0,50,500,0,0,0,0,0
movie_mode
The camera switches to movie mode.Clicking "shoot_full" will start and stop the movie recording.
For cameras with a 'movie' button, 'movie_mode' does not do anything.
Normally, it is simpler to use the command 'shoot_movie_for' described below.
nd_filter_off/nd_filter_in/nd_filter_out
These perform same functions as 'set_nd_filter' but are easier to remember and make your script more readable.number_of_images_to_capture_is
Used to specify the number of images in a bracketing mode.For Tv bracketing and digiscope bracketing this is usually an odd number.
Example:
number_of_images_to_capture_is 5
start_continuous_sequence
overlay_off/overlay_on
Normally, edge-overlay mode is disabled on power-up, even if you powered-down with it enabled.You can override this by using the 'overlay_on' command in an autostart script similar to the following :-
@title Overlay on
sleep_for_seconds 5
overlay_on
line_1 "#Overlay ON"
sleep_for_seconds 4
exit_alt
end
If the script is named Startup.bas, your normal default script will still be resident.
playback_mode
Camera switches to playback mode.Use 'record_mode' to return.
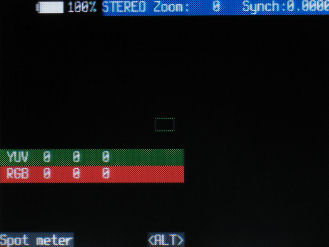
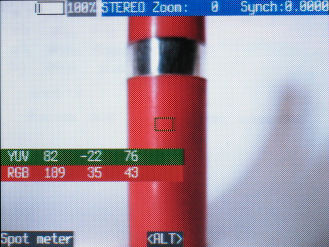
readYUV
Reads the luminance and UV chroma values from a 24 x 16 pixel area at the centre of the screen.No parameters are required, the values are returned in 'a', 'b' and 'c' (so be careful how you use them in the rest of your script).
To use as a spotmeter, zoom to telephoto setting.
The values are read from the live-image buffer and the correlation with the real scene values is not known.
The following script displays the YUV and calculated RGB values in non-scrolling format on the console:-
@title Spot meter
:test_md_loop
readYUV
r = (a*4096 + c*5743 + 2048)/4096
if r < 0 then r = 0
if r > 255 then r = 255
g = (a*4096 - b*1411 - c*2925 + 2048)/4096
if g < 0 then g = 0
if g > 255 then g = 255
u = (a*4096 + b*7258 + 2048)/4096
if u < 0 then u = 0
if u > 255 then u = 255
line_1 "# YUV ", a," ",b," ", c
line_2 "! RGB ", r," ",g," ", u
goto "test_md_loop"
 ...
...
record_mode
Returns to record mode from playback mode.restore_focus
Restores the camera focus to the value previously saved with 'save_focus'.An optional parameter will contain the focus-setting value.
Useful for long time-lapse sequences (especially with Eye-fi cards) that use hardware or software methods to reset the camera at intervals.
restore_zoom
Restores the lens zoom position to the value previously saved with 'save_zoom'.Useful for long time-lapse sequences (especially with Eye-fi cards) that use hardware or software methods to reset the camera at intervals.
save_focus
Without a parameter, saves the current focus setting as measured from the front of the lens.Optionally, provide a numeric value for the required focus setting.
The value saved may be inspected in Bracketing/Overrides as 'Saved focus' and even manually changed for reading by the 'restore_focus' command.
Useful for long time-lapse sequences (especially with Eye-fi cards) that use hardware or software methods to reset the camera at intervals.
save_stack
In bracketing modes, this command enables the saving of log files with the focus or Tv values recorded.The command should come before any command that starts the bracketing sequence.
Try adding it to the top of Example 2.
The log files are in folder 'A/CHDK/STACKS'.
save_zoom
Saves the zoom step of the current lens position.Useful for long time-lapse sequences (especially with Eye-fi cards) that use hardware or software methods to reset the camera at intervals.
send_data
This command sends two or three bytes of data to an external device by flashing the Print or autofocus LED's.If only two bytes are used, the data is sent once, otherwise it is sent twice to enable error checking.
The commands 'use_print_led' and 'use_af_led' allow you to choose either led.
The autofocus led is far brighter and may be easier to attach an opto-sensor to, especially if the camera accomodates an accessory-lens adapter.
The protocol is very simple and is described in the section Serial Communication with an external device
The following script sets parameter 'a' to 128 as a parameter identifier, you can choose any value you wish from -128 to +255.
It zooms the lens in and out and sends the zoom position to the external device (third byte not used) :
@title Tx data
@param a command
@param b low byte
@param c high byte
@default a 128
@default b 0
@default c 67
sleep_for_seconds 1
:loop
set_zoom_to_step b
" Sending data"
sleep_for_seconds 1
get_zoom d
send_data a, d, c
sleep_for_seconds 4
b = b + 1
if b <> 7 then goto "loop"
:loop2
set_zoom_to_step b
" Sending data"
sleep_for_seconds 1
get_zoom d
send_data a, d, c
sleep_for_seconds 4
b = b - 1
if b >= 0 then goto "loop2"
end