We also need to reduce the power of the 'no flash' camera so all of these operations are best incorporated into a script.
The script below (for the left camera) uses the 'set_sync' command to ensure that we are in synch mode and synch delay is disabled.
After running the script,the current delay-status will be shown at the top of the screen together with the delay value.
(you can change the position of any on-screen display element using the OSD Layout Editor).
For the left camera the value should be 0.0000 sec and for the right camera 0.0020 :-
@title Synch Test
@param a Synch enable
@default a 1
@param b Delay enable
@default b 0
@param c Fine (in 0.1ms)
@default c 1
@param d Coarse delay (in 0.1s)
@default d 0
@param e Flash EV -4 stops
@default e -384
rem get current flash override status
get_prop 28 f
>
rem get flash on/off status (2 = closed, 1 = ON, 0 = Auto)
get_prop 16 g
set_sync a b c d
:loop
do
until (is_key "remote")
rem turn-down the flash on camera that has delay disabled but flash is ON (not Auto)
if b = 0 & g == 1 then set_prop 28 e
shoot
sleep 20
rem restore original flash override status
if b = 0 then set_prop 28 f
goto "loop"
On the Right camera, set script parameter 'b' to '1' and 'c' to '20' (for 1/250sec)
Adopt the same shooting procedure as above but BOTH flashes should be on !.
On pressing the button, both preflashes will fire to allow the cameras to determine white-balance.
Tests have so-far shown that the resulting white-balance is the same on both cameras.
On releasing the button, the left 'no flash' camera will instantly fire its flash at -4 stops below nominal level.
After a 2 msec delay, the right camera will fire its flash at full-power and illuminate both images (in the vast-majority of cases).
After acquiring the images, half-press the shutter to interrupt the script and ALT to return to normal menu mode.
You can try even faster shutter speeds if you enter the correct delay values.
There will be a few more failures but still a very high success rate.
After deciding what shutter-speed you prefer for flash, make a copy of the above script but with delay enabled and a suitable delay for the shutter-speed.
Install that in the camera that will be providing the main flash.
For convenience, the SDM download includes scripts for synchronised shooting.
For normal use, run 'Synch.bas' on both cameras
For flash, run 'Synch_L.bas' on left camera and 'Synch_R.bas' on right camera.
The flash scripts assume a shutter-speed of 1/250 sec, alter them if you wish.
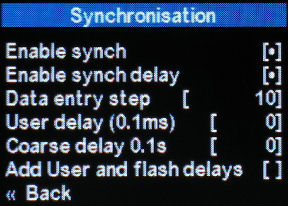
It is possible to introduce a delay before making the synchronised-flash shot.
In this case, use the menu 'Synch coarse delay 0.1s' to enter a value up to 9 seconds on both cameras.
The value has to be the same on both cameras, of course.
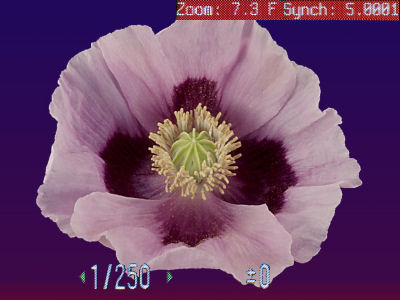
(Minimum fine-delay is 0.0001 sec, hence in left image above value is 5.0001 sec).
It is best to use shorter values as the 'clocks' in both cameras do not run at exactly the same rate and you will need to 'tweak' the fine-delay value on the 'flash' camera.
Single-shot, delayed single-shot and continuous shooting-mode with external flash is possible using a circuit and script devised by Damir Vrancic.
In that case, the delay is achieved electronically rather than by using a coarse-delay SDM setting and there is obviously no need for a fine-delay 'tweaking'.
See