I think it will work on MacOS 10.15 (Catalina) or later.
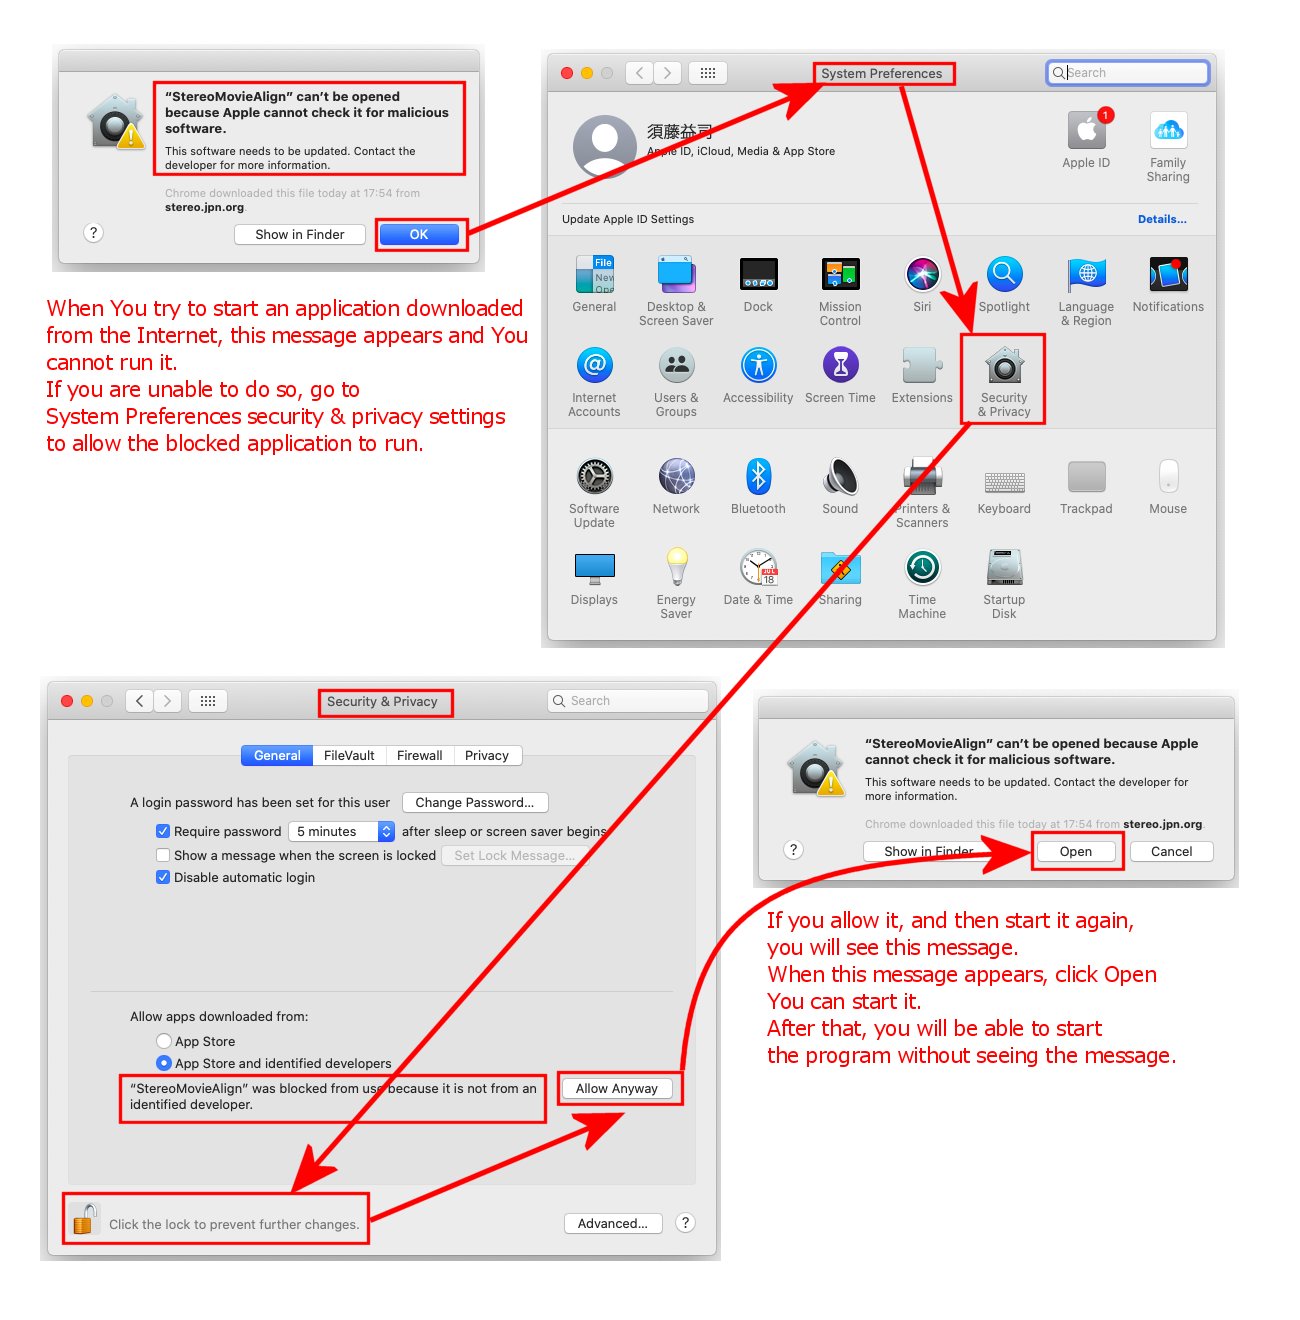
(Note) If you try to run an application downloaded from the Internet, a message will appear and you will not be able to run it.
Please allow it to run as follows.
How to use
1. Start a terminal , and run it with the folder path as an argument. (Please change the path name to match your environment.)
The following example shows a case where StereoMovieAlign and all other files and folders are stored in /Users/aaa/SMA folder.
(Drag and drop files and folders into the terminal with the mouse, and the full path will be entered at the cursor position)
left_folder(Subfolder containing the left frame images.) right_folder(Subfolder containing the right frame images.)
user@mac ~ % /Users/aaa/SMA/StereoMovieAlign /Users/aaa/SMA/left_folder /Users/aaa/SMA/right_folder
sbs_folder(Subfolder containing the SBS frame images.)
user@mac ~ % /Users/aaa/SMA/StereoMovieAlign /Users/aaa/SMA/sbs_folder
If only one folder is specified, it will be recognized as the folder where the SBS images are stored. If two folders are specified, it will recognize and process them as the left and right folders.
2. Selecting the adjustment frame
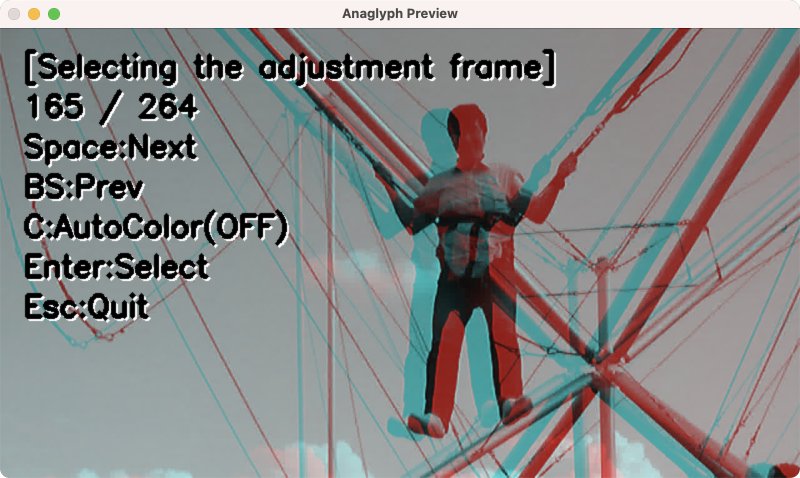
Displays the image in the center order of the sequential frame images stored in the folder.
Use the SP key to switch the image in the forward direction and the BS key to switch the image in the reverse direction, and display the frame you want to use for adjustment.
(Since all frame images will be processed using the values adjusted for that frame, please select a frame image that is easy to check for adjustment.)
Each time the S key is pressed, the display switches between left and right automatic color matching OFF -> left image reference -> right image reference.
Try using it in cases where the colors and brightness of the left and right images are different.
When you have finished setting the adjustment frame and automatic color matching mode, press Enter to automatically adjust the specified frame and switch to the depth adjustment mode.
Press the ESC key to abort the process and exit the program.
3.Depth adjustment
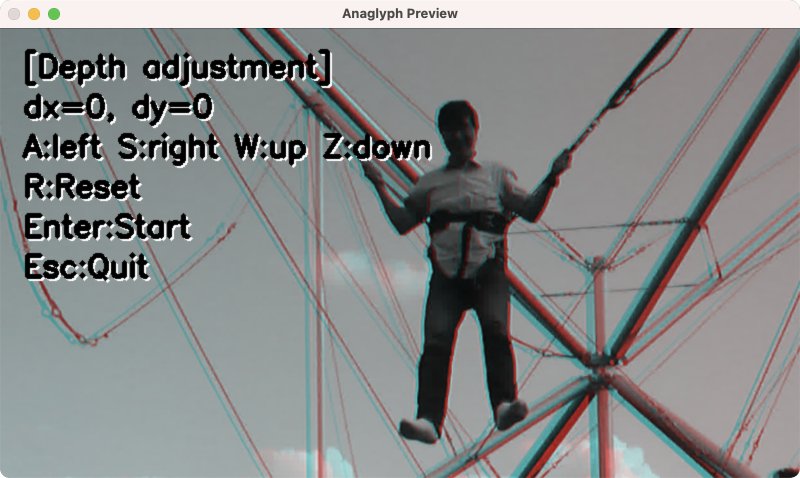
Auto-adjusted frame image will be displayed as anaglyph. Use the A/S key to adjust the depth, and the R key to reset the depth to the default value (0).
Adjust the depth so that it is appropriate considering the window violation.
After adjustment, press the Enter key to adjust all frame images with the same setting values, create an "out" subfolder directly under the input folder (or left folder in the case of separate left and right folders), and save them in the SBS format.
At this point, the image will be smaller than the original image due to the adjustment, but it will be cropped to have the same aspect ratio as the original image, and resized to the same size as the original image and saved.
(Pressing the o key instead of the Enter key will output the adjusted image as is.)
The progress of the process will be displayed in the terminal.
sh_set.zip The collections of shell scripts for automatic 3D video processing 2021/12/20
By using ffmpeg, you can extract sequential frame images from a video file, and vice versa. You can also extract audio from a video and embed it in another video, or embed tag information to be recognized as a 3D video by Youtube.So, by installing ffmpeg and being able to start ffmpeg in the terminal, I created a shell script that automatically performs input video -> frame image decomposition -> StereoMovieAlign auto-adjustment -> half SBS output video -> audio copy. You can find instructions on how to install ffmpeg on various websites, so please search and refer to them. Importantly, after installing ffmpeg, type ffmpeg in the terminal, press Enter, and make sure that ffmpeg starts up.
1. For Fuji 3D AVI (fuji_3davi.sh)
3D AVI format files shot with Fuji W1/W3 will output half SBS format MP4 videos that will be recognized as youtube 3D videos.
Form : fuji_3davi.sh Fuji3D.AVI Frame_rate(24)
Example : user@mac ~ % /Users/aaa/SMA/fuji_3davi.sh /Users/aaa/SMA/DSCF0001.AVI 24
2. For Pana 3D MTS (pana_3dmts.sh)
This shell script will output a 3D AVI file shot with Fuji's 3D1 as a half-SBS format MP4 video that is recognized as a 3D video by Youtube.
If the input is a half-SBS format video, other than Fuji's 3D1 MTS, I think this shell script can handle it.
Form : pana_3dmts.sh Pana3D.MTS Frame_rate(29.97)
Example : user@mac ~ % /Users/aaa/SMA/pana_3dmts.sh /Users/aaa/SMA/00001.MTS 29.97
3. For L/R independent 3D video (lr3d.sh)
Outputs half-SBS format MP4 video that is recognized as 3D video by Youtube from two separate L/R video files.
Form : lr3d.sh Left_video right_video Frame_rate
Example : user@mac ~ % /Users/aaa/SMA/lr3d.sh /Users/aaa/SMA/000_l.mp4 /Users/aaa/SMA/000_r.mp4 29.97
The resulting video will be output to the same folder with _out appended to the input video file name.
All frame image folders, etc. created during the process will be deleted at the end.
Double-click on the output video to play it in half-SBS format, upload it to Youtube, or use my web viewer to enjoy it.
To learn how to use these shell scripts, please see the Youtube video below.