Correct simple rotation errors
This procedure must be carried-out before any perpective rotations.
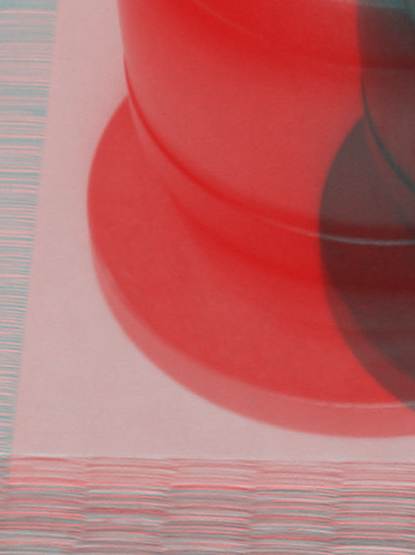
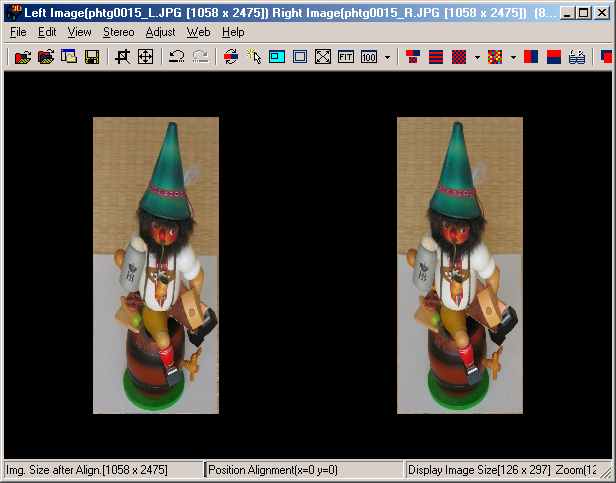
Display both images at 100% and drag with mouse until the left edge of the red image is at the left of the screen and you can see your bottom, horizontal guide-line (or bottom edge of the carefully aligned background paper).
Display just the red image and draw a line with the mouse (left-button down) along that edge as far to the right as possible.
On large images you may not be able to mark the entire bottom edge but that should have no effect on the final result.
Display both images again and drag so the left edge of the cyan image is at left of the screen.
Display just the cyan image and draw a line with the mouse along that edge as far to the right as possible.
Click 'Auto Adjust' and both images will be tilted the required amount to make the bottom edges horizontal.
Click '100%' to return image to window-size.
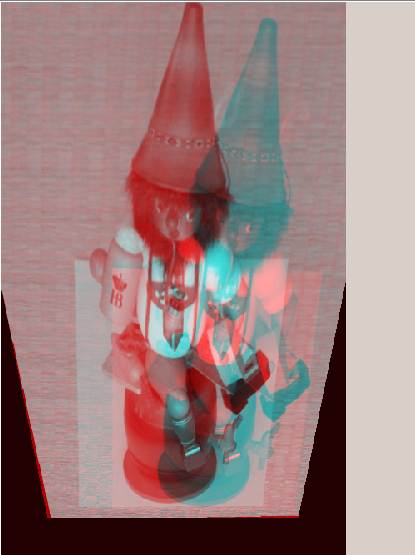
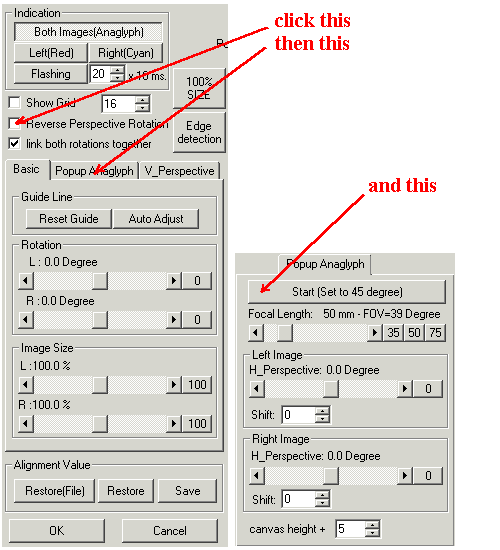
Finally, ensuring that 'Reverse Perspective Rotation' is not checked, click 'Popup Anaglyph' tab and 'Start(Set to 45 degree)' to apply a 45 degree default, perspective-rotation about the horizontal axis and an increased canvas-height of 5 units.
Perspective Correction
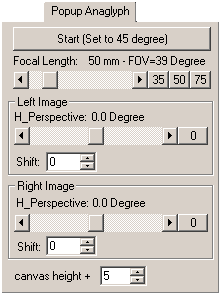
If the image is cut-off at the top, anytime the perspective-rotation around the horizontal axis is non-zero, you may alter the 'canvas' height by clicking the 'canvas height +' numeric Up/Down CheckBox.
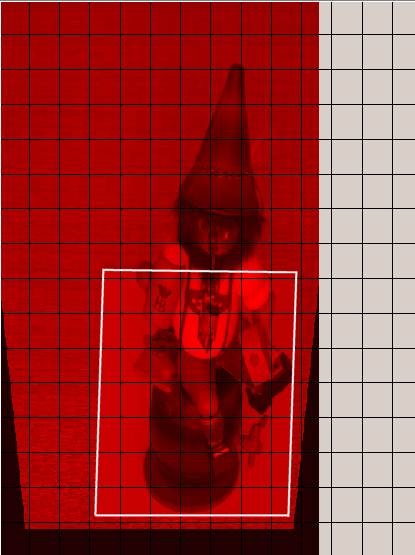
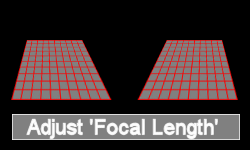
Select red image only and adjust 'focal length' until the side guidelines are parallel to each but tilted.
In other words they form a parallelogram.
You can make some marks on a piece of paper or use a ruler to check the on-screen horizontal widths of the background are the same at the top and bottom.
Turning on the grid overlay will aid this process and you may alter the number of grid-divisions by using the numeric Up/Down CheckBox to the right of the 'grid' checkbox.
Offset Correction
Now adjust the red-channel 'shift' value until the tilting lines become as vertical as possible.
If necessary, small changes may be made to the nominal 45 degree perspective rotation around a horizontal axis, in order to get the lines as vertical and parallel as possible.
Repeat these operations with the cyan channel.
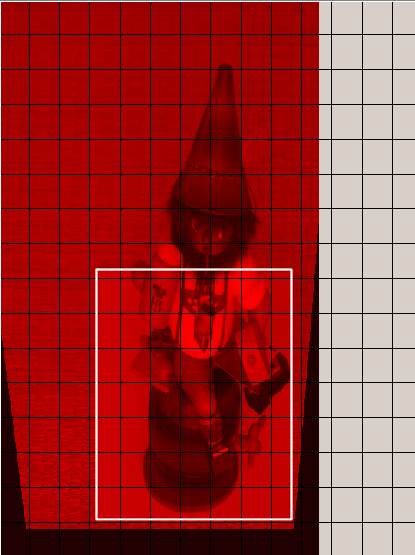
Equalise Image Sizes
With both images displayed, use the horizontal slider to superimpose both images and using the vertical-slider, align the bottom of the images.
Turn on the grid and check image height.
If the cyan image appears smaller (as shown above), the left channel needs making larger.
(remember, when both images are displayed, the left channel is displayed with a cyan color).

Increase image magnification until heights are same after the bases are aligned.
That is shown in the above image.
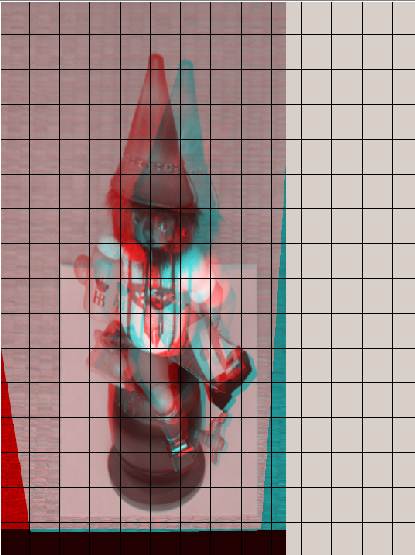
Foreshortening Correction
In order to increase the height of the image to the correct value, you will need a background square-grid, a known shape on the background such as a square or circle, or you will need to know the width:height aspect-ratio of the background.
With both rotations linked, use the H_Perspective control to produce a square grid, undistorted squares or circles or a height of the correct aspect-ratio.
If the vertical lines converge, adjust the 'focal length' setting until they are vertical.
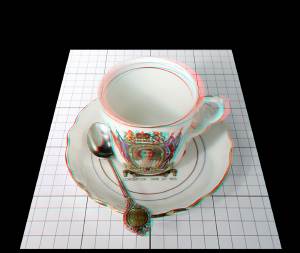
The image above image shows the result when a squared grid is used.
Set the Stereo Window
Using the horizontal slider, shift the images until the vertical lines at each edge are superimposed.If you are using the grid mentioned above, the target circles should also be aligned.
There should not be color-fringing at either edge.
If the perspective correction is incorrect, the image will appear to be tilted up or down and a difference of perspective correction between the left and right images will result in tilting of the image to one side.
The window should now be correctly set and you may check with your red/cyan glasses and sitting-back a little (after turning-off the grid).
Save Adjustment Settings
You may save the current adjustment settings by clicking 'Save'.
The settings are saved in the registry (overwriting the current contents) and also in a named file.
You may load the current values from the registry by clicking 'Restore' or from any named file by clicking 'Restore(File)' .
Press 'OK' to complete the process.
If the SPM folder contains a file named 'wall.gif', 'wall.png' or 'wall.jpg', the black background will be replaced by that texture.
A popup anaglyph object movie may be made by placing the subject on a turntable (such as an inexpensive 'Lazy Susan') and typically taking 36 images at 10 degree intervals.
Move the camera laterally and repeat.
Use the first image-pair to determine the adjustment parameters and then save them and use to manually-process the entire batch of images.
An example movie is available for download and is most conveniently viewed on a flat-screen display.
Crop and Save Image
Crop the image to exclude the calibration marks and save as separate left/right pair in an uncompressed format such as PNG.
Even if you just want anaglyphs, it is best to save your work as uncompressed non-anaglyph images.
These may then be used with other features in SPM (such as described below).
Change stereo viewing-mode to Anaglyph (half-color if desired) and print-out.
Place the print on an evenly-illuminated flat surface and viewing from 45 degrees adjust your distance until the 'sweet spot' is found.
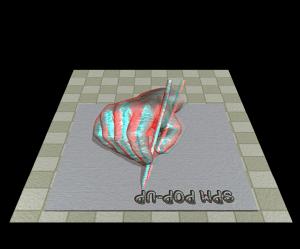
Enjoy your first Popup Anaglyph !
....
Images by kind permission of Steve Boddy ©
Creation of Popup Anaglyphs without a reference background.
Outside of the studio, a rectangular reference frame may be constructed from rods, pushed into the ground and carefully levelled and squared.
You should note the size of the subject and its distance from the camera and depending on the size it will be displayed at, calculate the camera spacing as described above.
A large camera spacing is required for subjects to be viewed at reduced size.
In many situations (aerial and planetary(!) shots, action, etc) a reference frame will not be practical so technically accurate results are impossible.
However, with care, results acceptable to most may be achieved by the following method :-
- Load images into SPM, select 'Adjust/Create Popup Anaglyph/popup/Start(set to 45 degrees)'
- Maximise the window, put on anaglyph glasses, double-click image to
display life-size,' drag-up until you can see bottom.
- Using H-position slider and fine-position arrows, adjust until bottom of
image is at the window.
If you position the mouse-cursor over the image, you can tell very accurately whether you are behind or in front of cursor (i.e. the window). - Drag the image down until you can see the top.
We need to tilt the top forward and this is done by applying equal and opposite 'Shift' values to the images.
That will bring the top to the window.
There should be no colour fringes around any background elements if they are truly at the window and there are no vertical or 'simple-rotation' errors.
Double-click the image to exit life-size display mode. - We have not checked for rotations, vertical misalignment or size errors.
Now we know how to get the background to the window, you could start again and correct those errors first.
- Click OK and save image as PNG (or TIFF).
- Load your anaglyph image as Stereo/Color Anaglyph.
Select 'Adjust/Create Popup Anaglyph' and click 'Reverse Perspective Rotation'.
Select 'Popup' tab and click 'Start (Set to 45 degrees)'.
That is what your print will look like when laid flat and viewed and you can judge how accurate the ground-plane is.
Batch Creation of Popup Anaglyphs
If you have a batch of images taken under the same setup conditions, including object-movies, rather than saving the first image, select the Multi Conversion option.
Remember to restore the adjustment settings from your saved text file, select the required output-format and some or all images in your folder.
Click 'OK' and all the Popup Anaglyphs will be automatically created.
Batch creation of Camera-view of Anaglyphs
For use with a website gallery of Popup Anaglyphs, it is useful to display a stereo image of what a viewer looking at the completed anaglyph would see.
There is no need to take a photo of this, simply load the cropped 'Popup Anaglyph' left/right images into SPM, choose 'Create Popup Anaglyph', check 'Reverse Perspective Rotation' and then 'Popup Anaglyph'.
Click 'Start(Set to 45 degree)' to apply a 45 degree default, perspective-rotation about the horizontal axis and an increased canvas-width of 5 units.
Make any minor adjustments for the required effect and save the settings as a suitably-named text-file.
Click 'OK' and select the Multi Conversion option.
Remember to restore the adjustment settings from your saved text file, select the required output format and some or all images in your folder.
Click 'OK' and all the Camera-views of your Popup Anaglyphs will be automatically created.
 ....
....
(to be viewed with anaglyph glasses)
Images by kind permission of Steve Boddy ©