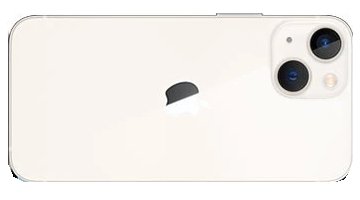
In the iPhone11Pro/12Pro/13Pro/14Pro, the main and telephoto trinocular cameras are aligned side by side.
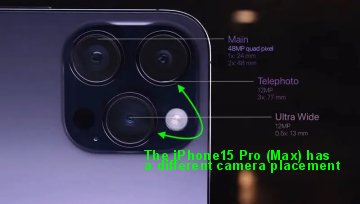
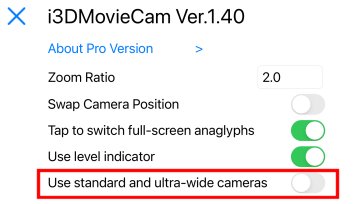
On the iPhone15Pro (Max), the camera arrangement has changed so that the main and ultra-wide angle cameras are now side by side. Please turn on "Use standard and ultra-wide cameras" in the settings (you will need to restart the application for the setting to take effect).
For other models, it is a 2D video/still image application with a single camera. (I don't see the point in daring to use it.)
You can adjust the position of the left and right camera images, preview them in various stereo formats, save videos (in-app purchase required), and save still images.
You can use it without paying for it by displaying it in full screen and capturing a video of the preview, but if you support the development of the app and like it, please pay for it.
Once you make an in-app purchase, the functional restrictions will be lifted and you will be able to save videos freely. (The price may vary slightly, but it is about $1.99)
Please note that the iPhone camera will be used in a different way than it was originally designed, so please be aware of the following limitations before using it.
Since two cameras with different angle of view, focal length, and f-number are combined to match the angle of view using the zoom function (zoom magnification can be changed by setting), the following problems may occur depending on the shooting conditions.
- Because the depth of field is different on the left and right sides, the background on one side may be out of focus while the background on the other side is not.
- Because of the different focal lengths, one side of the image may be out of focus. Telephoto cameras, in particular, do not seem to be able to focus at distances of 30cm or less.
- The position of the left and right images may change due to the auto focus operation. It is recommended to press the AF button to lock the focus before shooting.
- The synchronization accuracy should be fine for practical use, but since they are separate cameras, it is not perfect.
Basic usage
The stereo base (distance between the two cameras) is very narrow at 15mm, so if you are more than 1m away from the camera, it may not look 3D.
Also, if the subject is too close, the camera, especially the telephoto side, will not be able to focus, so it is best suited for shooting subjects at a distance of 30-100cm.
The autofocus operation will change the position of the left and right images, so make sure the focus is correct, press the AF button to lock the focus,
Then aligning the left and right images, select the stereo format and resolution you want to save, and press the movie recording button to start recording.
Press the Recording Button again to finish recording and save the recorded image in the Photo Folder.
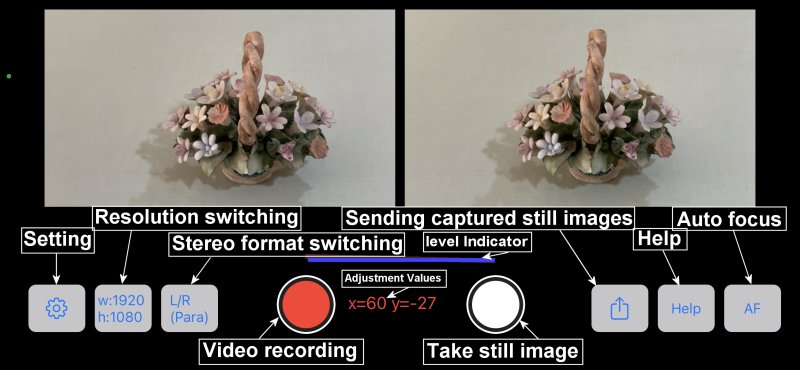
1. Adjusting the position of the left and right images
While previewing in any stereo format, you can adjust the horizontal position by scrolling with one finger or vertical position by scrolling with two fingers on the image.
After adjusting the vertical position, adjust the horizontal position by checking the depth of the image while watching the preview.
The adjustment value is displayed at the bottom center of the screen and is automatically saved. When you tap the adjustment value display, a confirmation message for clearing the value will appear, and you can also clear it.
If you check "Tap to switch full-screen anaglyphs" in the settings, tapping on the image will switch to the full screen anaglyph position adjustment mode, which will make it easier to adjust.
When you are done adjusting, tap the screen to return to the main screen.
2. Stereo format switching
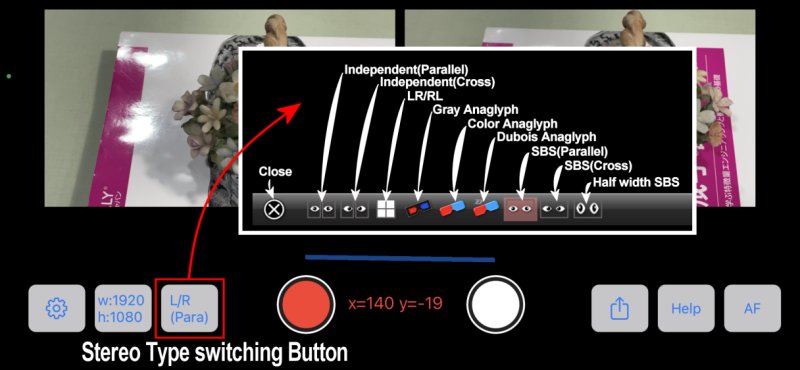
When you press the Stereo Format button, a list of available stereo format buttons will appear.
The selected stereo format will be previewed, saved as a movie, or saved as a still image.
Independent(Parallel/Cross) will be saved as separate left and right files when saving video. For still images, they will be saved as a single SBS image.
Otherwise, they will be saved as a single file in the selected stereo format. The maximum size is 1920x1080, so if you select SBS(Parallel/Cross), the image will be 960x1080 on one side.
If you want to save the video in 16:9, please save the Independent(Parallel/Cross) or Half width SBS.
Press the leftmost X button to return to the initial screen.
3. Resolution switching
Press the Resolution Switch button to switch between 1920x1080(16:9), 1440x1080(4:3), and 1080x1080(1:1) in that order.
4. Setting
Press the Settings button to display the application settings screen.
About Pro version : An in-app purchase screen will appear to remove the recording function limitation. You can also restore your purchase.
Zoom Ratio : This is the zoom ratio used to adjust the angle of view of the left and right cameras. The standard zoom ratio is 2.0, but for the iPhone 12 Pro Max, enter 2.5.
Swap Camera Position : Check the iPhone 12 Pro Max, as the left and right camera positions are reversed from other models. Do not check for other models.
Tap to switch full-screen anaglyphs : Tap on the image to switch to full-screen anaglyph positioning mode.
Use level Indicator : Displays a level indicator on the screen. When the camera is level, the line turns blue, which enables you to take pictures without tilting.
5. Sending captured still images to other applications
When you take a still picture, a button replaces the picture you took, and when you press that button, you can select the application to which you want to send the picture.
If you shoot in indipendent left and right images mode and send them to i3DSteroid, you will be able to perform detailed editing such as automatic adjustment.
6. Auto focus (AF)
Press the AF button to toggle between auto focus and focus lock.
When using autofocus, the position of the left and right images will change randomly and appear blurred, so it is recommended to lock the focus, especially when shooting.
7. Help
Display this help file.
8. Full screen display
Long-tap the screen to switch between full screen and normal view.
The full screen display can be send to a PC via WiFi using an app called NDI HX Capture, which can be used with the Zoom camera to deliver 3D video in real time.
9. Video Recording
Press the red button at the bottom of the screen to start recording and display the elapsed recording time. Press it again to stop recording and save it to My Albums in the stereo format you are viewing.
10. Still image capture
Press the white button at the bottom of the screen to save the image to My Albums in the stereo format you are viewing at the time.
Precautions for use
The GPU is fully utilized to convert the left and right camera output into real time 3D images for display, which may cause the device to generate heat when used continuously.